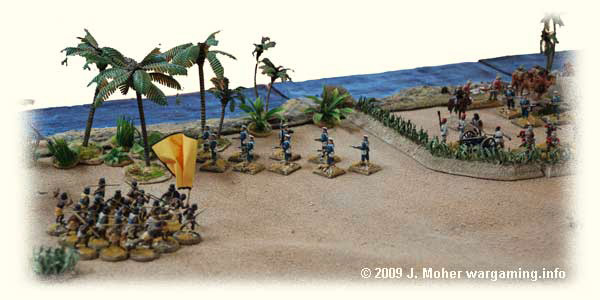
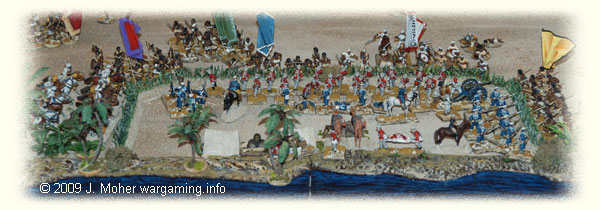
Having camped but a days march from the approaches to Wadi Halfa in late September 1883, Sir Henry Frotheringham’s relief column is suddenly assaulted in the early dawn by a large Dervish Force…!
Facing Sir Henry is a significant force (a full ‘Flag’) under the Khalifa Abdullahi that hopes to give the infidel invaders a good thrashing; it includes 3 of its 4 Amirs, and the troops from 3½ of it’s 4 Rubs supported by artillery (although unfortunately only half it’s riflemen are present) – still a sizable force. Sir Henry’s intrepid column consists of:
- C-in-C [2m]: Sir Henry Frotheringham, & his ADC Colonel Rudolph Barnard
- 1st Company, 19th Yorkshire [20] – Lieutenant Willoughby Wilcox
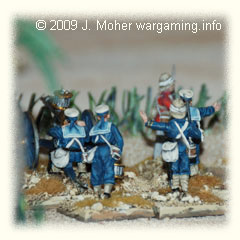
- 3rd Division, The Naval Brigade [20] – Sub-Lieutenant Robert Goodall
- HQ, The Naval Brigade MG Battery [1m] – Commander Horatio Webber
- 2nd Section, Naval Brigade MG Battery [4 + Gatling] – Chief Petty Officer Valentine Scott
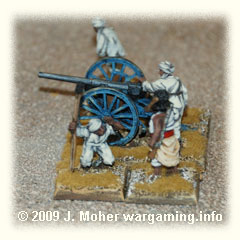
- 1st Section, ‘A’ Battery, Egyptian Artillery [4 + Krupp 6pdr] – Musa Hikel Zulfakar Effendi
- Column Baggage Train [10 Baggage Animals + Handlers]
Note: m = Mounted.
The Dervish force contains:
- Flag C-in-C: Khalifa Abdullahi & Escort [3m]
- 1st Rub: Amir Hamdan & Escort [2m]
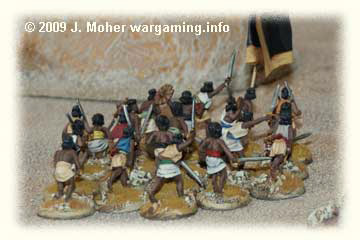
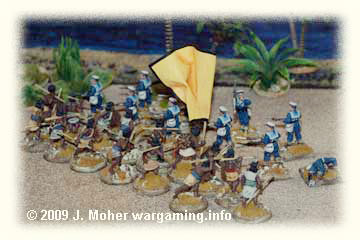
- 3 Bands Hadendowah ‘Fuzzy-Wuzzies’ [3 x 20]
- ½ Band ‘Fuzzy-Wuzzy’ Riflemen [10]*
- 2nd Rub: Amir Vali & Escort [2m]
- 2 Bands Hadendowah ‘Fuzzy-Wuzzies’ [2 x 20]
- ½ Band ‘Fuzzy-Wuzzy’ Riflemen [10]*
- 3rd Rub: Amir Raslan & Escort [2m]
- 2 Bands Dongolavi Ansars [2 x 20]
- 1 Band Baggara Cavalry [12m]
- Assorted ‘Flag’ Artillery [4 with 1 Krupp 6pdr & 4 with 1 Older Smoothbore]
* In our Fire & Sword campaign Bands of Riflemen are usually only 10-figs strong; while normal Spear & Sword armed Infantry are the usual TSATF 20-figs strong. There is also a chance in the first 6 campaign turns they can be Poor (shoot like Zulu Rifles) unless deemed ex-Bashi-Bazouks’ or Egyptian Army Deserters, etc; otherwise they are rated normally as per TSATF rules; and from turn 7 onwards all ‘Ansar Arab’ Riflemen are considered to be the more effective Jihadiyya.
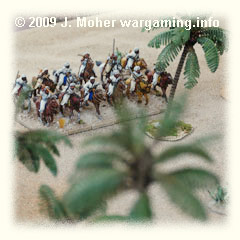
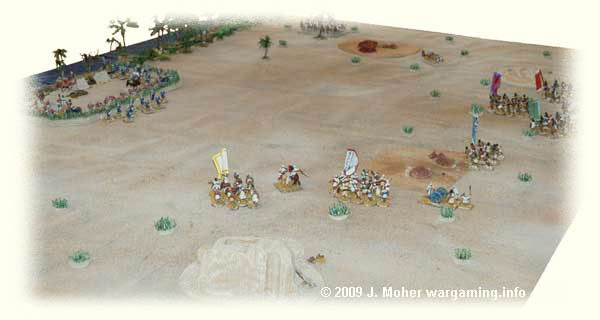
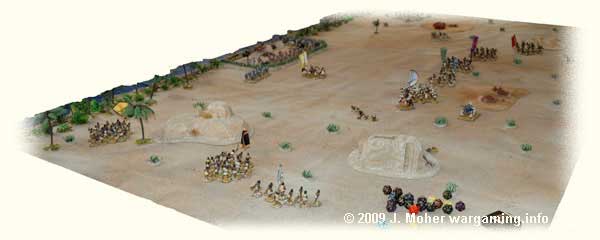
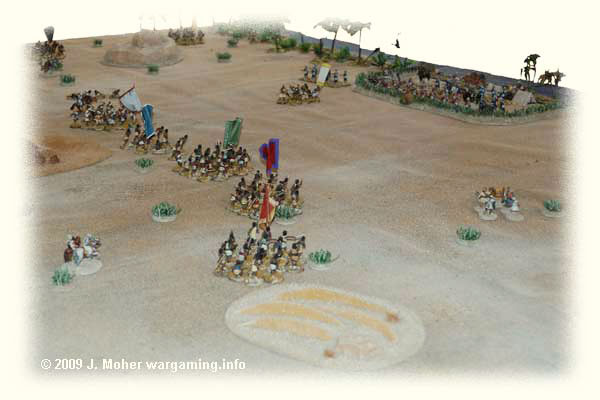
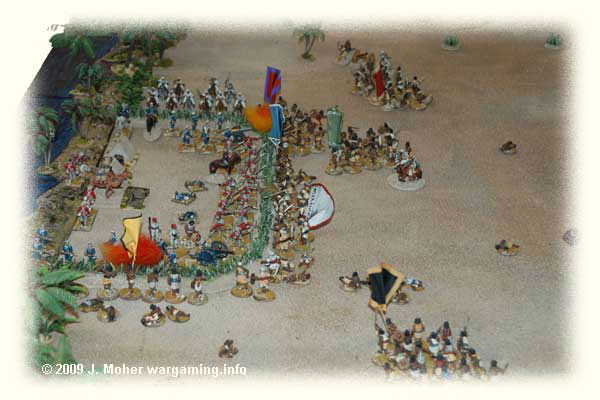
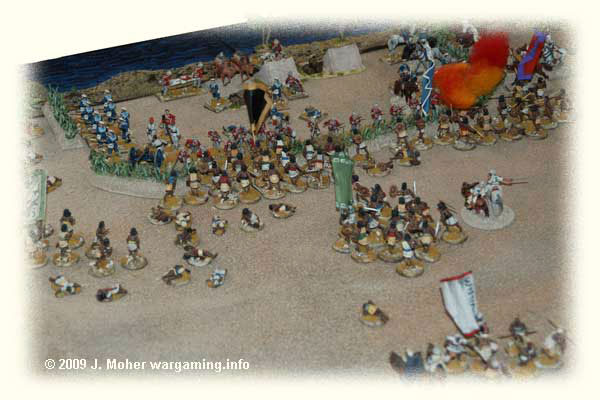
The Khalifa Abdullahi planned a mass assault from three sides on the infidel invaders’ Zeriba at dawn, however complexity proved too much for the simple folk who made up the Dervish Warriors, and they were unable to achieve launching all their attacks simultaneously at sunrise. The Anglo-Egyptians thereby gained sufficient warning to stand to in their Zeriba… The 3rd Rub (under Amir Raslan) and the Flag’s Baggara Cavalry were first to launch their attacks, heading forth on time as the first rays of the sun appeared in the eastern sky… The other two Rubs of Hadendowah Fuzzy-Wuzzies, advancing on either side of Amir Raslan’s Dongolavi Ansars, suffered some disorder and not being familiar with the territory were late in attacking, arriving gradually during the dawn period after Sunrise.
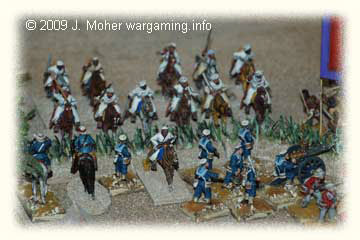
The sight of just a small body of Ansars approaching had an unexpected, some say inexplicable side effect however; in a fit – and there is some debate of what, Colonel Barnard saying it was complete inspiration, while some of the junior officers say utter foolhardiness and disregard for the men – Sir Henry ordered the Naval Brigade Division (i.e. Company) to open the Zeriba and dispatch half their complement outside to advance on the approaching Dervishes in skirmish order! What was Sir Henry planning…? Meanwhile the Baggara Cavalry Band and an old Smoothbore Field Gun manned by ex-Bazingers had appeared on the Anglo-Egyptians left, although the horse showed little interest in closing on the Zeriba.
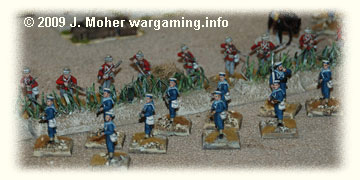
As the brave Sailors exited and formed up beyond the Zeriba, to face the oncoming mass of Dervish Ansars, the 1st Rub (Amir Hamdan’s 4 Bands of Hadendowah Fuzzy-Wuzzies, including 1 with Rifles) began to appear in sight, heading straight for the Zeriba alongside the Dongolavi (see below)! This was the largest part of the Dervish force, and was positioned to the left-centre of the Anglo-Egyptian position… It looked like the Zeriba’s right flank would face little serious threat…
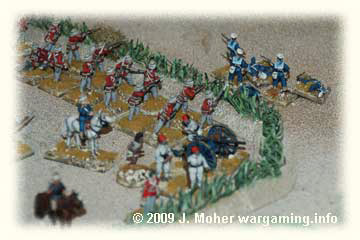
Gamely, and in the truest tradition of the Royal Navy, the half-company of Naval Brigade Sailors had ventured forth to face the approaching Dervishes with true British pluck! Elsewhere Dervishes had now got the first of their artillery, the old Muzzle Loading Smoothbore Field Gun manned by ex-Bazingers, into range of the Zeriba and loosed off some shots at the Naval Gatling Gun team in the left hand corner – which went decidedly wide, burying themselves somewhere in the desert well short of the Zeriba! Due to a severe case of incompetence that was actually the only ammunition the gunners had, so half the Mahdists’ artillery was already silenced for the remainder of the battle without having achieved a thing! On the other hand the Egyptian Gunners in the Zeriba with their Rifled Krupp 6pdr Field Gun weren’t so ineffective, and over the first two turns promptly landed some well placed fire on the closest Band of Amir Raslan’s Dongolavi Ansars, causing especially significant casualties and killing the Sheik of the 1st Band on the second turn (see above right). The Naval Brigade Gatling also opened up at long range, firing ineffectively at the Smoothbore Field Gun’s Bazinger Crew on turn one, but switching targets on turn 2, they then inflicted minor casualties on the leading Fuzzy-Wuzzy Band of Amir Hamdan.
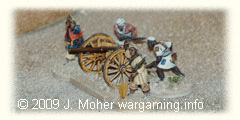
The balance of the Mahdist Artillery had arrived by this time (a Rifled Krupp 6pdr crewed by Egyptian Army Prisoners) and the Overseer was cracking his beating-stick furiously on the Egyptian Dogs to haul the gun into position as rapidly as possible! And still the plucky half-division (company) of the Naval brigade outside the Zeriba stayed outside, letting rip at extreme range with rapid independent fire at the first band of Dervishes! To little effect however, and one suspect much nervousness…
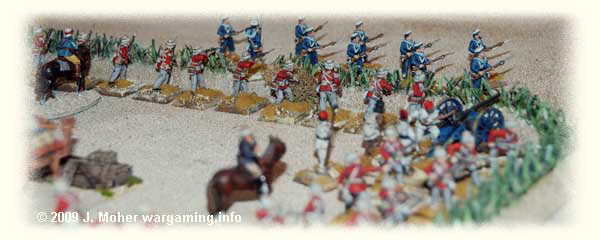
By this time the sun was almost up beyond the skyline and in the centre the first Dongolavi Ansar Band put in a spirited charge, and were almost at the Zeriba; the Naval Brigade Half-Division actually had managed to do some fast work to avoid being drawn into Melee in Open Order with the Ansars! The sailors had deftly redeployed towards the right flank of the Zeriba, side stepping the screaming Dervishes just in time, as the latter charged passed obsessed with reaching the Zeriba… The Dervishes hadn’t quite made it to the Zeriba, and now took heavy casualties from the Yorkshire infantry and Egyptian Artillery within the Zeriba. The Naval Detachment had closed ranks into Close Order as they avoided the Dervishes, prudently one assumes in anticipation of receiving the approaching Ansars next turn, and contributed a little fire to that of the Yorkshire above (see below). Meanwhile Amir Hamdan’s 1st Rub of Hadendowah were dangerously close behind the Dongolavi Arabs, and could soon be closing on the Zeriba too!
Then the balance of the Dervish forces arrived, the 2nd Rub of Amir Vali with 3 more Bands of Hadendowah Fuzzy-Wuzzies (including 1 with Rifles) appearing on the very flank the Naval detachment had moved too! The poor sailors, expecting to avoid the main assault and fire into the Dervishes’ Flank were now faced with being directly in the path of 2 rapidly approaching Bands of Fuzzy-Wuzzies! Needless to say the debate over Sir Henry’s sanity continued vigorously amongst the officers with this new development! As for the thoughts of the poor Petty Officer leading the detachment outside the Zeriba – can you guess?!

The Dervishes’ Egyptian Prisoners managed to successfully sabotage the firing of their Dervish weapon, the misfiring consuming 50% of the available ammo! The Overseer was not impressed and the beating-stick got some prolonged use (see below)! Meanwhile the Anglo-Egyptian artillery fared a little better inflicting more damage on the approaching Ansars, however the Naval Gatling wasn’t having a good day and jammed* much to the chagrin of Both Sir Henry and the Sailors crewing it! “If only they had Martini-Henrys…” bemoaned Sir Henry of the Naval MG Crew!
We are using the QRS table’s supplied in TSNS (The Sun Never Sets) Campaign Book, which includes a standardised D20 system for all morale checks, and I have a version with minor modifications for the firing and morale based on historical data and personal preference. The TSNS tables includes a rather harsh grading of the early period (i.e. 1879-1885) 0.45″ Boxer Cartridge version of the Gatling Gun (I have assumed the 0.577″ Martini-Henry variant is intend to be included in this), giving it a 50% chance of a jam each time it fires – I had toned this down to 40% but we found even that (as seen in this game), while possibly historical, was somewhat unplayable in TSATF! You’ll find I’ve talked more on this in our campaign rules on the Our First Fire & Sword Campaign page.
Regardless, the Dervish ring was closing around the Zeriba; the Naval Brigade Half-Division had formed up on the right of the Zeriba only to be outflanked by the last Rub of Fuzzy-Wuzzies appearing on that flank, and as the Mahdist forces came into Rifle Range of more of the British Infantry orders resounded for frantic rapid independent fire along the line. Minor casualties were inflicted by the Anglo-Egyptians, but on the whole the firing was desultory, and losing his nerve Sir Henry restricted the Gatling team to reduced fire (i.e. less than half their maximum possible rate) to avoid the risk of it jamming again! Needless to say it contributed nothing to Dervish casualties for the turn.
However the leading Dongolavi Band had now taken sufficient casualties combined with the earlier loss of its Sheik to finally give up the ghost – so close but so far – literally only 100 yards from the Zeriba they were reduced to only a couple of survivors who broke and headed back for the safety of the desert…
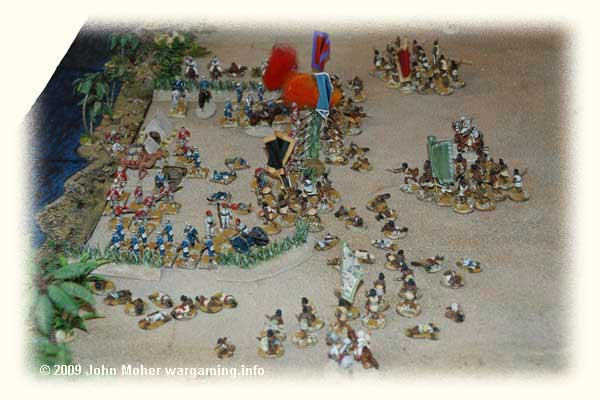
Meanwhile the remaining Bands of Dervishes poured forth remorselessly, well most of them; for some reason a couple of the Fuzzy-Wuzzy Bands on the British Right proved most tardy in their punctuality, showing little interest in advancing, a bit of luck for the British! Despite this things were starting to look a touch perilous for our dauntless Sailors, but still Sir Henry did not bring them back to the comfort of the Zeriba (see below)!
As the Dervishes closed the Naval Brigade detachment outside the Zeriba dithered, then finally the Petty Officer ordered forming square at the instigation of Sir Henry who was yelling orders furiously from over the Zeriba… However Sir Henry had been in the process of planning moving the balance of the Naval Brigade Division over to that right side of the Zeriba (which was currently vacant) to support their comrades, but opted not to hurry them along as he became distracted by forming the Square outside, which he then subsequently realised would obstruct the field of fire of the Sailors inside the Zeriba anyway so cancelled the order to move! They were currently in reserve in the centre of the Zeriba, the left flank having been vacated as the Baggara Cavalry appeared to threat to the Zeriba in that area, so suffered a serious case of order, counter-order, disorder! The Naval detachment outside however were able to perform additional manoeuvring, reverting to Open Order and moving under the shade of the Palms* – although at who’s instigation, Sir Henry or the Petty Officer in command, is unclear! Sir Henry then regretted countermanding the order for the balance of the Company to move to a position of support along the Zeriba, they would have now had a partial field of fire on the Dervishes if they had! Meanwhile the Egyptian Artillery Section redeployed to fire in support of the Naval Brigade (see below).
* The Red Joker had come up in the move sequence, allowing an Anglo-Egyptian unit to manoeuvre a second time.

By this time the Fuzzy-Wuzzies were charging and the Naval Brigade was facing imminent danger of being overrun, could they inflict enough casualties and halt the fierce Hadendowah warriors? Firing all round was rather poor, although the Gatling Gun managed to take out a couple of Fuzzy-Wuzzies on the British left (firing at full effect), and the Dervish Gun crewed by the Egyptian Prisoners fired off it’s last ammunition and failing to hit anything. In the centre a Fuzzy-Wuzzy Band of Riflemen fired off a volley at the Yorkshire lining the Zeriba, and got a hit, wounding one of them. Unfortunately they also exhausted their meagre supply of ammo!*
* Kieran and I were not rolling well for ammo – to make things a bit more unpredictable we rolled for each Mahdist unit separately, and Kieran got 1 for his Gun, 1 for his Fuzzy-Wuzzy Riflemen, and then a 6 for his Baggara Cavalry (who had only 3 Rifles, the rest having Javelins & Spears)! Meanwhile I did only marginally better with a 2 for my Gun, and a 4 for my Fuzzy-Wuzzy Riflemen – except the latter were being incredibly tardy and averaging about 6″ of movement each turn – would they even get in range in time to do anything?!

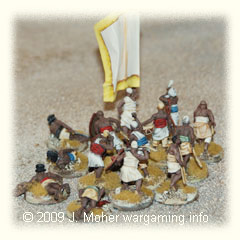
But for the Naval Brigade detachment all was not good, the Fuzzy-Wuzzies were in amongst them and a barrage of thrown spears had immediately felled the Petty Officer with a wound, leaving the Sailors leaderless just as the Fuzzy-Wuzzies crashed into them and the melee got started (see above right)! Predictably the ensuing melee did not go well for the outnumbered Sailors, who got absolutely trammelled – losing 1 dead and 5 wounded in addition to their wounded Petty Officer! The 3 survivors were only able to recover the PO and 2 of the wounded and hurriedly run for the gate to the Zeriba (see left), abandoning the other 3 wounded to their dreadful fate with the victorious Fuzzy-Wuzzies! The Sailors would have to ‘hoof it’ with their wounded comrades over their shoulders before the main Dervish Force reached the Zeriba and cut them off! The Dervishes were within a couple of hundred yards of the Zeriba and the battle was about to really heat up – literally! Sir Henry, meanwhile seemed little concerned for the fate that had befallen the valiant Naval Brigade Sailors!

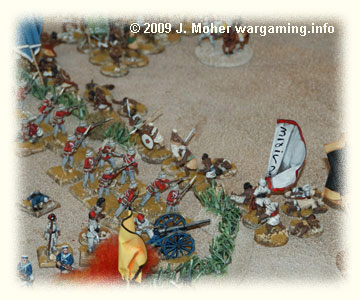
With the Naval Brigade half-division managing to flee in the gate of the Zeriba at the last minute, and the men of the Yorkshire Company just able to drag the Camel Thorn gate closed in time, the first Dervish unit reached the front of the Zeriba, the Dongolavi Ansars were soon frantically pulling at the camel thorn in an attempt to rip open an opening in the Zeriba as the Yorkshire frantically commenced rapid independent fire into them! On the British Right the victorious Fuzzy-Wuzzies, fresh from despatching the abandoned wounded Sailors, were soon scrambling at the Zeriba, looking to get at the balance of the Naval Brigade beyond! Sir Henry was in the thick of it here, personally overseeing the actions of the sailors on this flank!
Musa Effendi meanwhile was doing a fantastic job running the Egyptian Gun Section, he kept the gun remorselessly in action, and repeatedly reposition to fire first on the frontal attackers, then those on the right flank, then back again – the Egyptian Crew performed magnificently and contributed significantly to the defence of the right corner of the Zeriba! Back in the centre more bands of Fuzzy-Wuzzies had reached the Zeriba, including the now ammo-less Riflemen, and were either ripping at the thorns or attempting to get fires started… On the British left the Baggara Cavalry themselves had even rushed up to engage the Zeriba, see that flank open and the British heavily engaged elsewhere… They were soon milling around outside the Zeriba, while some audacious riders attempted to jump the Zeriba, others conducted harassing fire into it with Rifles or thrown Javelins & Spears. The Naval Gatling team opened up again and the gun promptly jammed again! All along the line the British Infantry blazed away with rapid independent fire, and the ammunition stocks soon dwindled! The survivors of the Naval Brigade detachment showed true British determination, and having deposited their wounded comrades in the centre of the Zeriba for the attention of the expedition surgeon, they prepared to reform and rejoin the fight (see above & below).
On the left Colonel Barnard promptly rallied the 3 Naval Brigade survivors and lead them to the defence of the Zeriba to deter the Baggara Cavalry, seeing the threat Commander Webber left the guns to their crew commanders and also came to assist. Soon the Sailors were blazing away with rapid independent fire at the cavalry, and even the two mounted officers were discharging their Revolvers into the milling mass of cavalry beyond the Zeriba. Colonel Barnard was heard to retort to Horatio Webber “…it’s like shooting ducks in a barrel”, although Webber was to comment later there was no evidence that Barnard managed to actually hit a single target…! However their mettle was soon put to further test as a cavalryman finally jumped the Zeriba and was inside amongst them – Two Sailors quickly engaged the Dervish in close quarters and dispatched him with some gusto, perhaps in acknowledgement of their failed efforts outside the Zeriba…? Meanwhile the Gatling gun had been cleared and now opened up with some authority, CPO Scott finally had the gun operating reliably and it started to tear into the mass of Fuzzy-Wuzzies now assaulting the left corner of the Zeriba.
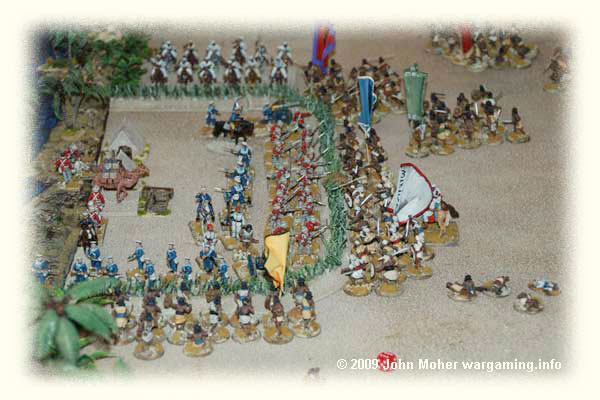
On the British Right the Fuzzy-Wuzzies had succeeded in starting a fire and the tinder dry Camel Thorn was soon blazing away, although the relentless fire of the other half of the Naval Brigade Division was tearing huge holes in their numbers… But the rest of their Rub were closing in and soon would be there to support them! Along the centre the Ansars on the British Right were well into ripping apart the Zeriba, and despite serious casualties were half-way through the ‘hedge’, on the British centre-left the Fuzzy-Wuzzy Riflemen were also attempting to rip a second opening, while on the left corner the band of Fuzzy-Wuzzies opposite the Gatling Gun had succeeded in torching the Zeriba, a second brisk fire soon engulfing it! On the far left, the harassing fire of the Baggara was proving ineffectual, but the Sailors had managed to despatch another cavalryman with Rifle fire (see below). By now the rapid fire of the British defenders had seriously depleted the ready ammo with the units and they’d soon need to send runners back to resupply from the column baggage train!
With the Zeriba on fire in two places and frantic Dervishes pulling the main front section of the Zeriba to pieces the Anglo-Egyptian force was under serious threat, ammunition was running low and they just weren’t doing enough casualties to stop the Dervishes! In the centre suddenly a gaping hole appeared in the Zeriba (see right), as the last of the brave Dongolavi Ansars finally broke through the thorns and cleared the way into the camp. The Yorkshire redoubled their efforts firing off every last round to hold back the Dervishes, while runners frantically returned to the baggage train for resupply, and the brave Musa Effendi kept the Egyptian Artillery blazing away at point blank range, trying to hold off the Dervishes from reaching the exposed opening! On the left corner opposite the Gatling the fire had gone out and thankfully not seriously damaged the Zeriba, and the Gatling managed to keep blazing away without jamming, although it failed to do any serious harm to the attackers, perhaps the Fuzzy-Wuzzies now realising to duck when they heard the distinctive noise of the Gatling opening fire! Sir Henry’s concern with the Gatling and the whole left half of the frontline had by now seen him move to that area to personally oversee the defence.
The brave Ansars finally broke, and were soon fleeing to the rear, although more Fuzzy-Wuzzies were ready to renew the assault. On the British Right the fire had burnt furiously and although now out had consumed a section of the Zeriba, the enthusiastic Fuzzy-Wuzzies threatening to break into the camp and attack the Sailors – however a particularly vicious series of independent fire decimated them just as they were preparing to charge, and they too broke and were soon streaming to the rear… These were small successes for the British however, huge numbers of Fuzzy-Wuzzies were swarming all around the Zeriba and it’s integrity was collapsing, there were 2 reasonable gaps in the perimeter, and on the left the fire had been restarted there and was looking menacing. The British were desperately shuttling ammunition up from the baggage train with runners, but could not afford to send too many men for fear of weakening the firing line.* Just to cap things off another Baggara rider catapulted themselves into the camp and directly engaged Barnard and Webber – however they again were able to fight off the intruder, and the 3 Sailors continued to cause casualties in the milling cavalry, whose sporadic return fire was singularly ineffective.
* I allow the Baggage Train to have a set amount of reserve Rifle, Artillery, & MG ammo – typically simply the total fire increments on hand of all units combined then halved, and that total split again 2/3 Rifle and 1/3 Artillery & MG increments. Units can then send a fig (or more) back to the Baggage Train and when they return to the unit they will have brought back 1-3 (random) increments of Rifle ammunition, or 1-2 increments of Artillery or MG ammunition. Sending a second or third figure (or if a single figure manages to obtain a pack animal) to bring the ammo back improves the probability the higher amount is brought back, and so on.
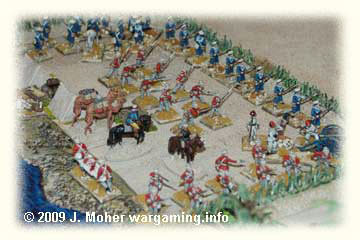
The second Fuzzy-Wuzzy Band of Riflemen had also finally closed up by this time and began some fire at the Egyptian Gun Crew, getting a hit and killing one of the unlucky Fellahin! At the same time the Fuzzy-Wuzzies were pouring into the camp, however some traffic control problems meant two Bands were both trying to enter through the main gap, while the one on the British Right was left unpressured! The Fuzzy-Wuzzies were soon in amongst the Yorkshire and a brutal melee ensued, with both sides taking heavy casualties, but the Yorkshire ultimately had half their company thrown back from the defence line after suffering 2 Dead & 2 Wounded, and the Fuzzy-Wuzzies were in the camp! On the British left the fire continued to burn and a third gap was now about to appear in front of the Gatling Gun. The British defence was now resorting to controlled Volley Fire as the supply of ammo dwindled and relied on a stream of runners to bring it up, but a small victory was achieved on the left where the Cavalry had by now been decimated and reduced to about one-third their original numbers (see below). Musa Effendi’s Gun Section was out of ammo at this critical moment and would need to send runners back to resupply despite having already lost a crewman, or withdraw from it’s critical position next to the major breach. There were 4 Bands of Fuzzy-Wuzzies poised to flood the camp and all looked lost for Sir Henry!
And then the unimaginable, the Fuzzy-Wuzzy Band that had broken into the camp broke, and routed, and the entire Dervish force’s morale collapsed* like dominos and on the verge of complete victory the entire force fled back into the depths of the desert, their brave resolve and heroism failing just before they had realised victory was imminent. Sir Henry had pulled off a miraculous, and rather lucky, victory!*
* For the campaign we have added a simple army level morale to prevent Dervish forces in large games making extreme stands to the last figure, thereby giving the British a tangible objective in battle rather than the need to individually break every single unit, or kill the Dervish C-in-C and get lucky.
Also using the D20 morale (from TSNS) the Fuzzy-Wuzzies are significantly more formidable than normal Ansars (which is possibly historical), being about 20% more likely to complete their charges and also being a little (5%) better on Critical Morale – with this force being about 70% Fuzzy-Wuzzies it guaranteed when attacking they’d get someone into melee most times a unit charged, putting extra pressure on the Brits… I had intended we’d use the optional ‘Fanatical Fuzzy-Wuzzies’ rule as well (basically units that lose a leader have a chance of going spontaneous and and charging continuously ignoring all morale checks for the rest of the game) – but I think the D20 morale bonus for charging is more than enough to distinguish them, and outside Eastern Sudan for future campaign battles I’ll reduce further the likelihood of Fuzzy-Wuzzy troops versus normal Ansars to avoid “Fuzzy-Wuzzy Heavy Super Forces” like the above in Northern & Southern Sudan.
Post battle an unexpected bonus for Sir Henry was the return of the 2 casualties in the Yorkshire reported MIA (presumed Dead after the brutal hand to hand fight in the camp), they were found alive, with minor wounds, feigning dead amongst the piles of Dervish casualties after the position had been overrun. A bonus for the force as every casualty will be telling. The final casualty roll was:
1st Coy, 19h Yorkshire: 2 MIA & 1 Wounded RTD; 2 Wounded recovering.
3rd Div, The Naval Brigade: Wounded PO RTD; 1 Wounded recovering; 5 Dead, MIA or DOW.
1st Sct, ‘A’ Bty, Egyptian Artillery: 1 Dead.
(RTD = Returned To Duty, PO = Petty Officer)
Sir Henry has not as yet indicated if any cases have sufficiently warranted a mention in despatches or nomination for a gallantry award. Meanwhile the force prepares to raise camp and quickly enter Wadi Halfa while the effect of their victory on the Mahdist supporters is fresh…
The figures used in this game were a few of mine (the Baggara Cavalry, Gun with Bazinger Crew, and most of the British & Dervish Mounted Leaders), with the remainder on both sides being Roundie Steward’s (Miniature Addiction). The terrain was all from my collection except the Palm trees which were supplied by Kieran Mahony (6mm Wargaming).
Return to Fire & Sword Turn 02: December 1883.
Larger Images of the Battle


One thought on “Fire & Sword Battle 02: The March to Wadi Halfa”