Conducting Group and Cross-Fires in Crossfire can sometimes be a bit of a ‘trap for young players’ for the beginner. As a result I’ve endeavoured to provide a simple little graphic tutorial that hopefully will illustrate the process fairly clearly and help explain some of the benefits…
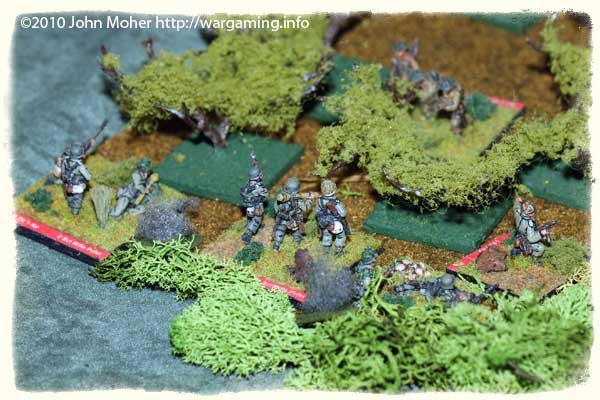
There are several common mistakes (or perhaps misreading of the rule’s text is a better term) so this basic example will attempt to step through the main points. In our example a German Platoon has somehow managed to enter a small orchard (or olive grove) encountering a single British Squad within. Both the British Squad and the entire German Platoon are fully within the terrain feature – this means they both gain the advantage of Light Cover, and both sides have clear line of sight to each other despite the trees (as there is no intervening terrain feature or obstacle). A German Squad was previously PINNED and the British Squad has just finished phasing fire at the Germans, managing to PIN a second Squad before losing the initiative to the Germans; as Pins are not sufficient to retain the initiative (a Suppression or better being required). We take things up in our example as initiative has just passed to the German Player…
This is the situation then as presented in the first illustration below, the German PC (Platoon Commander) is now faced with a dilemma; he can try and close assault the British, but only has himself and 1 Squad who can actually move, and the British still have the ability to reactive fire to this movement. He can attempt to rally his PINNED Squads however this is still a somewhat risky option – while the British can’t reactive fire at a RALLY attempt, as mentioned it’s still a possible chance of losing the initiative, and furthermore the left hand Squad is too far away for the PC’s bonus to be able to help it (i.e. it is not within 1 base width).

However, all 3 Squads are eligible to FIRE, as all have LOS (Line of Sight) to the target and none are SUPPRESSED. However because the target is in light cover all firers will drop 1-Die, so Rifle Squads with 3D will only get to roll 2D. They could try and just all fire individually, but they are much better to co-ordinate their actions, either under a Squad NCO (by means of a Group Fire) , or under the PC (as a Crossfire).
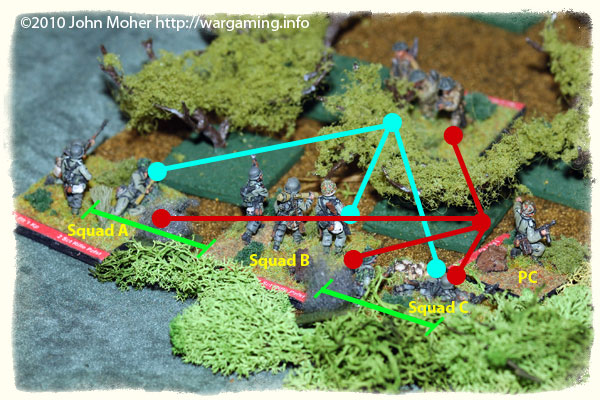
In the illustration (below) you can see the requirements for a CROSSFIRE in Red & Blue – the PC has LOS to all 3 Squads and LOS to the target (red), while all 3 Squads conversely have LOS to the PC (red) and LOS to the target (blue). However, a GROUP FIRE by all 3 Squads is also possible by SQUAD B declaring itself the GROUP LEADER (representing that Squad’s NCO or such taking the initiative and temporary control or leadership of the neighbouring troops) – because both Squad A and C are within a base width (the green lines) of Squad B, and all 3 have LOS to the target (blue), they can fire together in a Group led by Squad B.
Note that if Squad C chose to be Group Leader only Squad B could help, Squad A being well beyond 1 base-width.

In our example the German player elects to perform a ‘Crossfire’ as, after all, we are playing Crossfire!
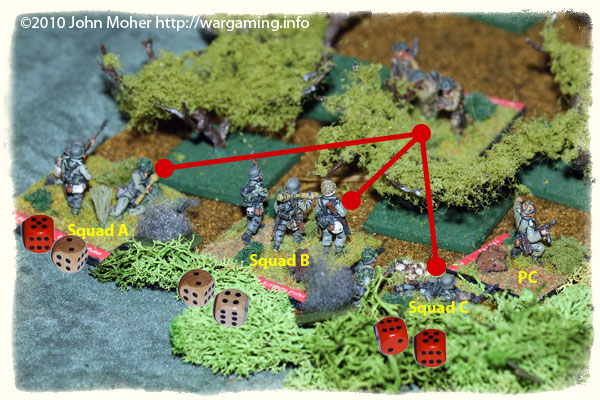
The common mistake novice players make is to assume they get to roll all the dice for these squads together – this is not the case – a Group or Crossfire just lets you roll for all the squads INDIVIDUALLY before you determine the result, see whether you retain the initiative, etc… In our example the German player elects to roll from left to right checking each squad in alphabetical order.
Squad A rolls it’s 2D (remember they have lost 1D due to the orchard or olive grove), and scores 5 + 2, getting 1 hit, a reasonable result with 2D but not sufficient to retain the initiative – however they have PINNED the British Squad, who will have to rally before they can move once the British gain the initiative… Note that if the German Squads were firing individually they would immediately lose the initiative at this point and Squads B & C would not get to fire – the British taking the next action…
Squad B rolls it’s 2D and scores a lowly 2 + 4 which is not good – it’s fire is ineffective. It looks like the German’s are going to lose the initiative as they have yet to score a Suppression or higher.

Squad C rolls it’s 2D and saves the day 6 + 5, two hits, a SUPPRESSION – not only have the German’s retained the initiative, but they are also halfway to a KILL on the British Squad. The PIN result is removed from the British Squad and replaced by the much more severe Suppression. Note that being able to roll all 3 Squads firing and only requiring one of them to achieve a result has greatly enhanced the ability of the German Platoon to achieve an effect and retain the Initiative.
Where To Next?
The German player could now choose to simply conduct another Crossfire, there is a reasonable chance, even with just rolling 2D three times, that they can eliminate the British Squad (needing just 1 Suppression to finish them off). However if they don’t believe any other British troops can fire on them (from beyond the orchard or olive grove) they may find it more effective to Close Assault the now Suppressed British Squad – although only 1 German Squad can still move, with the PC assisting (with his +1) in the combat, the single German Squad can engage the British at +3 (or even +4 if the German’s are Veterans), versus the British Squad’s probable +0 (i.e. the British would only have a 1 in 12 (or a 1 in 36 if the German’s are Veterans) chance of defeating the Germans)…
And such is the tactical challenge of Crossfire, as the German Player would you just fire again to hopefully eliminate the British Squad, or would you risk the daring Close Assault, or are you the cautious type who would try and Rally one or both of your PINNED Squads before attempting the Close Assault with the whole Platoon?
This scene was an actual combat from one of games playing “Scottish Corridor” from the Hit The Dirt Scenario Book.
Brilliant John. Even I can understand this, so that means that surely newbie taking up Crossfire will be able to follow the ‘Group fire’ and ‘Crossfire’ terms. Errol.
Cheers Errol – yep hopefully it’s of use to a few… 🙂
Brilliant John. Even I can understand this, so that means that surely newbie taking up Crossfire will be able to follow the ‘Group fire’ and ‘Crossfire’ terms. Errol.
Cheers Errol – yep hopefully it’s of use to a few… 🙂