February regularly sees the BattleCry Convention in Auckland, one of the larger NZ Wargaming events that is usually well run and encompasses more than just miniatures gaming (i.e. board gaming, card gaming, LARPing, etc). This year Gerry & Carolyn Webb of Castaway Arts (from Cairns, Queensland, Australia) decided to attend with a trade stand and some TSATF (The Sword And The Flame) demo games – as I’m a big TSATF fan I organised with Gerry to help him with the games, and provide all the troops and terrain – thereby saving Gerry & Carolyn having to cart their own from across the Tasman! The games were run as Public Participation & Demonstration games; although the former is a fairly rare concept in New Zealand so not overly familiar to many local gamers.

However general interest was high, Gerry & Carolyn got some reasonable interest in their Figures & TSATF Rulebooks, and the games attracted reasonable attention and we even had some brief participation by 1 or 2 people. The following is a summary and photos of the games played over the 2 days…

Game 1 – Scenario
An Anglo-Egyptian Column has been detached off on an independent mission to locate some Victorian Ladies, who are out in the hinterland and at risk of being captured by the rapidly spreading Dervish revolt. As the column approaches the village in the region where the ladies were travelling their worst fears are realised as the news arrives that the local sheikh and tribes have revolted and joined Al Mahdi – the ladies are prisoners of the Dervishes and must be rescued!
Game 1 – The Action
Gerry was Valentine Baker, Anglo-Egyptian Column Commander, and I was commanding on behalf of ‘Al Mahdi’.
 consults his standing orders (TSATF Rulebook)")

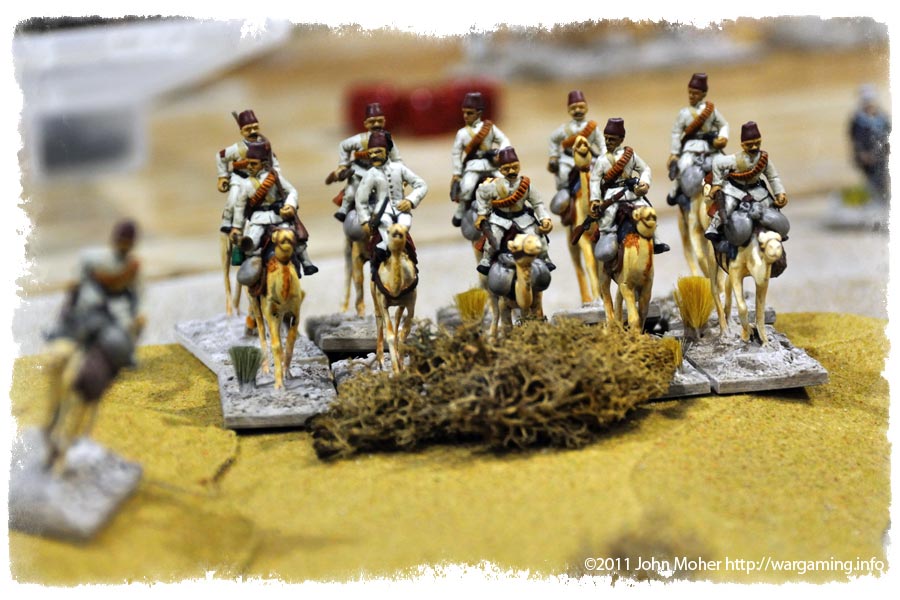
Baker Pasha decided on a fairly conservative advance up the valley to the village – he sent his Bashi-Bazouks forward to check out the road ahead, while his Egyptian Camel Corps Company moved off to the right to reconnoitre the high ground. Baker himself stayed in reserve with the Rifle Company of the Yorkshires and the Naval Brigade’s Gardner MG detachment – who were escorting the baggage column.
The Bashi-Bazouks sent scouts out to their left to investigate the large Wadi running up the valley, while the Camel Corps did likewise to the highest point of the valley foot hills on the right. In the centre the Yorkshires held back in support but sent their own scouts up the centre-right to investigate the lower foothills and the large Thorn Thicket about halfway to the village.
The Bashi-Bazouk Scouts quickly stumbled onto the leading Dervish Band, hiding in the bottom of the Wadi, and raised the alarm allowing the main force of Bashi-Bazouks to deploy to face the threat. On the right the Yorkshires Scouts reached the Thorn Thicket, only to find it teeming with Jihadiyya Riflemen!

The Bashi-Bazouk Scouts were very nimble on their feet and rapidly evaded the Dervishes, retiring back to the centre of the valley, followed closely by the Dervishes who swarmed up out of the Wadi and starting forming up for a charge at the lip. Of more concern was the appearance of a second band, this time Fuzzy-Wuzzys, hastening along the bottom of the Wadi towards the Anglo-Egyptian rear, threatening to out-flank the column before it had even moved half-way to the village. At the same time yet another Dervish Band, led by the Amir commanding the ‘Red Flags’ Rub, surged forth out of the Thorn Thicket – planning to also bear down on the Bashi-Bazouks! Things weren’t off to a good start for Baker Pasha!

The Jihadiyya in the Thorn Thicket then opened up with a volley and gunned down the unfortunate Yorkshires Scouts, killing half and leaving the remainder wounded & dying before them, while the Bashi-Bazouks’ in turn fired off a partially ineffectual volley at the first Dervish Rub, that had emerged from the Wadi, bringing down a small number. The Yorkshires had now rapidly moved forward to fill the gap in the centre, keeping the baggage column in close proximity. Baker Pasha had sent his ADC, Hakizimana Bimbashi, across to supervise the Bashi-Bazouks, and as they composed themselves to receive the Dervish charges their scouts rejoined the main body. On the far right the Egyptian Camel Corps had dismounted on the high ground to prepare for skirmishing action.

In the centre the Jihadiyya fired off a devastating volley into the approaching Yorkshires, cutting down many men (4-figs) – including the Scouts already lost the Company had now had 30% wounded or killed in action! Meanwhile the second Band of Dervishes closed in precariously on the Bashi-Bazouks’ right flank. Elsewhere Baker Pasha quickly deployed his last reserve, the Gardner Gun, to cover his rear and protect the Bashi-Bazouks’ left-rear – expecting Fuzzy-Wuzzys to soon be pouring from the Wadi behind the Anglo-Egyptian forces…
The first Dervish Band successfully charged into the Bashi-Bazouks, and a deadly melee erupted, the Bashi-Bazouks having slightly the better of it and acquitting themselves well and driving off the surviving Ansars, who were reduced to 40% of their starting strength (8-figs) while the Bashi-Bazouks retained about 50% (10-figs) plus another 15% wounded (3-figs).

However in the process Hakizimana Bimbashi had been killed fighting alongside the Bashi-Bazouks, and they in turn had also lost their leader and second in command. The Jihadiyya meanwhile hit the Yorkshires with another devastating volley, reducing them to only 50% (10-figs) with a further 30% (6-figs) of wounded to be cared for. The Camel Corps meanwhile had not been idle either and in moving to support the Yorkshires had been copping some of the Jihadiyya rifle fire, having suffered 10% of their number (2-figs) wounded.


The Dervishes that had charged broke, and promptly fled across the Wadi and into the high ground to escape the Bashi-Bazouks, prompting the Fuzzy-Wuzzys in the Wadi to cut short their flanking move and begin scrambling up the Wadi’s bank to fall upon the weakened Bashi-Bazouks – Baker Pasha rode over to personally take charge of the Bashi-Bazouks at this turn of events. The second Band of Dervishes meanwhile failed to charge home onto the exposed Bashi-Bazouk flank, and in addition to taking hits from the fire of the Yorkshires they fell back pinned & went prone. The Jihadiyya, having exhausted their ammo charged forth from the Thorn Thicket, massacring the surviving wounded Yorkshires Scout in the process – the blood chilling screams undermining the rest of the Company’s morale – before they headed for the dismounted Camel Corps! In the rear the Gardner Gun came into action, starting to mow down the mass of Fuzzy-Wuzzys streaming out of the Wadi! Meanwhile Al Mahdi was contemplating whether to commit the remainder of his reserves, The Dismounted Camel Corps join the actionhe still had 2 Bands of Ansars and a force of Camelry concealed further down the valley along with his Green Rub Commander, but for now he told that Amir & Ansars to remain concealed until the outcome of the initial attack (which still promised further success) was resolved…

In The village the Victorian Ladies, who had been herded into the cattle corral, could hear the firing down the valley growing in intensity – and hoped soon to be freed from their captors, their hopes rising…
Despite suffering 25% casualties (mostly from the Naval Brigade’s Gardner Gun) the Fuzzy-Wuzzys were soon out of the Wadi and about to fall upon the Bashi-Bazouks. The recently repelled Dervish Band also rallied and rose to their feet ready to resume their charge, and the Jihadiyya sped across the lower slope of the hillside heading for the Camel Corps Company. Meanwhile the Anglo-Egyptian ammunition supplies were almost exhausted.

Baker Pasha’s Troops pulled themselves together to repel this fresh charge from the Fuzzy-Wuzzys, the second Band of Ansars, and the Jihadiyya, nervously fingering their last couple of rounds of ammunition as they came on… To their rear the Gardner Gun chattered away incessantly at the Fuzzy-Wuzzys, as the Dervish host charged! Down the valley Al Mahdi gave the order for the remaining forces to enter the action, and 2 more Bands of Infantry and the Dongolavi Camelry prepared to move from their hiding places to join the attack – A glorious victory was imminent mused Al Mahdi…
Game 1 – TSATF Forces
Anglo Egyptian Column
- (General) Valentine Baker Pasha & (Major) Hakizimana Bimbashi
- A Company, Yorkshire Regiment (20-figs British Infantry)
- Abdul Waali’s Irregular Bashi-Bazouk Company (20-figs Egyptian Infantry)
- 1st Company, Egyptian Camel Corps (12-figs Egyptian Camelry)
- A Section, Naval Brigade Gardner Gun Battery (4-figs British MG team)

Dervish Forces of the Mahdist Uprising
- Al Mahdi & Servants
- 1 Band of Camelry (12-figs Camelry: 3-Rifles/9-Spear or Sword)
- Green Flags Rub:
— Amir & Bodyguard
— 2 Bands of Dervish Ansars (20-figs Spears & Swords)
— 1 Band of Hadendowa Fuzzy-Wuzzys (20-figs Swords & Spears/Throwing Sticks) - Red Flags Rub:
— Amir & Bodyguard
— 2 Bands of Dervish Ansars (20-figs Spears & Swords)
— 1 Band of Jihadiyya Riflemen (20-figs Rifles)
All the Figures & Terrain in this game are from my collection except the Palm Trees which are from Kieran Mahony’s.
Game Images Gallery
Click on any of the below to see larger resolution images of the game:


- Read on with Game 2: TSATF at BattleCry 2011 [2], or
- Jump to Game 3: TSATF at BattleCry 2011 [3], or
- See Still More TSATF at BattleCry 2011 Photos.
WOW! Great stuff! Now to Part 2….
Larry
WOW! Great stuff! Now to Part 2….
Larry
Hey Larry – sorry for very late response – I’m glad you enjoyed it – frenetic pace I know but captures the feel I think you’ll agree…? 🙂