As described in Fire & Sword Turn 04: February 1884 Sir Henry’s column continued South towards Dongola, and at the 3rd Cataract is met by the first supply steamer to have made it beyond the 2nd Cataract. It resupplies his column and brings welcome reinforcements in the form of the 2nd Company, 19th Yorkshire Regiment (who are also wearing the freshly issued and newly designed Grey Serge Uniforms intended for the expedition), as well as the 1st MG Section, The Naval Brigade (operating Gardner Guns). The reinforced column is soon in Kerma and quickly continues on to Dongola, conscious of the possibility of European hostages or prisoners being held there. As it finally approaches the town Sir Henry is surprised with a sudden onslaught by the defending Dervish forces!
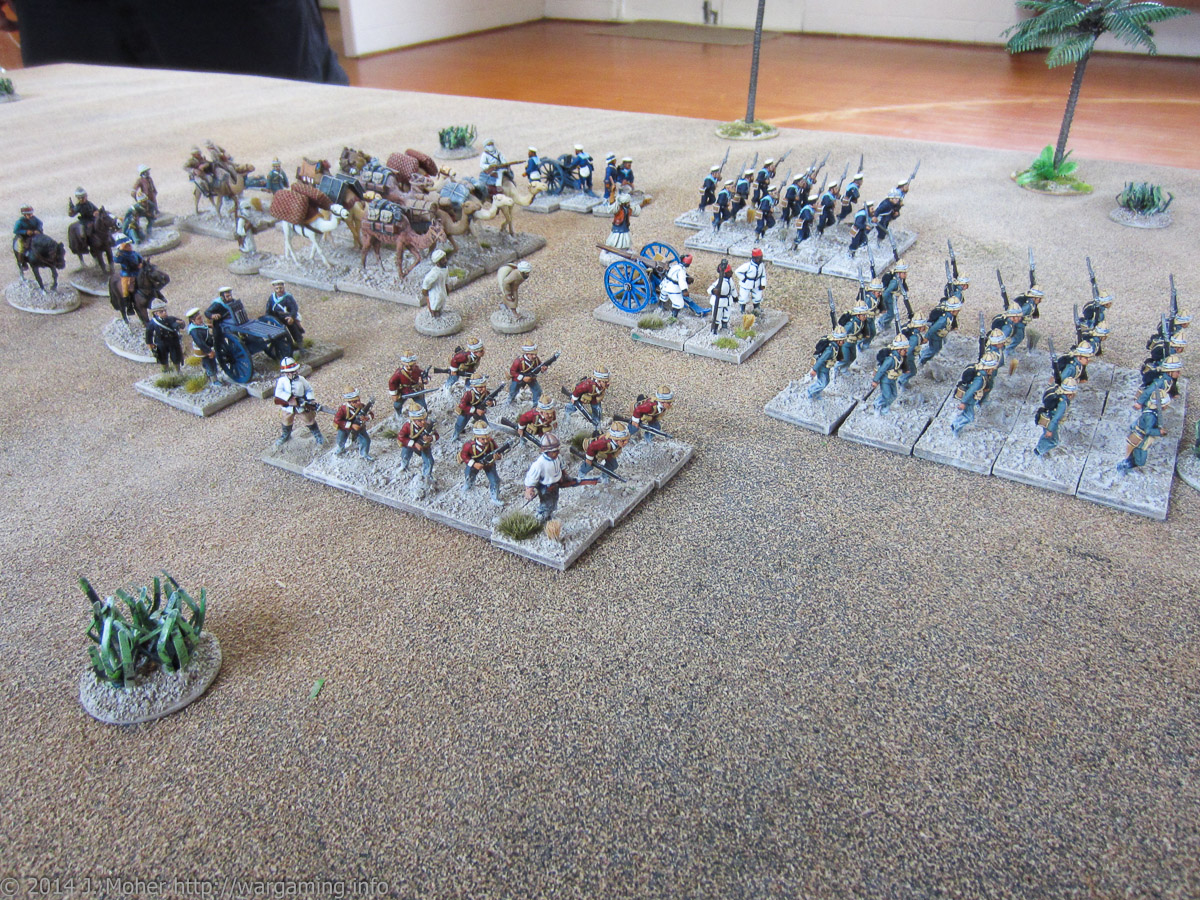
With the fresh reinforcements, Sir Henry’s the desert column looks like this (with all the wounded grouped together in the baggage train with the Hospital Corps & Dr. Furtwangler):
- C-in-C: Sir Henry Frotheringham & his ADC Colonel Rudolph Barnard [2m]
- 1st Company, 19th Yorkshire [12 + 5W] – Lieutenant Willoughby Wilcox
- Graf von Schnyder (attached to 1st Coy, 19th Yorkshire)
- 2nd Company, 19th Yorkshire [20] – Lieutenant Sebastian Huronoby-Middlegood
- 3rd Division, The Naval Brigade [13 + 4W] – Sub-Lieutenant Robert Goodall
- HQ, The Naval Brigade MG Battery [1m] – Commander Horatio Webber
- 1st MG Section, Naval Brigade Battery [4 + Gardner] – Petty Officer Haversham Jones
- 2nd MG Section, Naval Brigade Battery [4 + Gatling] – Chief Petty Officer Valentine Scott
- 1st Section, ‘A’ Battery, Egyptian Artillery [3 + Krupp 6pdr] – Shawish Hikel Zulfakar
- Column Baggage Train [10 Baggage Animals & Handlers + 2 Arab Guards]
- Doctor Ernesto Furtwangler (attached to Baggage Train/Hospital Corps)
Note: W = Wounded; m = Mounted.
Opposing the Anglo-Egyptian column is the local Dongolavi Region Mahdist Army, commanded by (Amir) Sheikh Rasiwala Fahmy el-Din el-Mousa, a committed follower of al-Mahdi:
- C-in-C: Amir el-Mousa & Escort [2m]
- ½ Band of Amir Mousa’s ‘Bazinger‘ Bodyguard [10]
- ½ Band of allied Beja Hadendoa Fuzzy-Wuzzy Camelry [6m]
- 1st Rub (The Red Flags): Amir Sha & Escort [2m + 3]
- 3 Bands Dongolavi Ansars [20 each]
- ½ Band Dongolavi Riflemen [10]
- 2nd Rub (The Green Flags): Amir Yonus & Escort [2m + 3]
- 3 Band Shaigiya Ansars [20 each]
- ½ Band Shaigiya Riflemen [10]
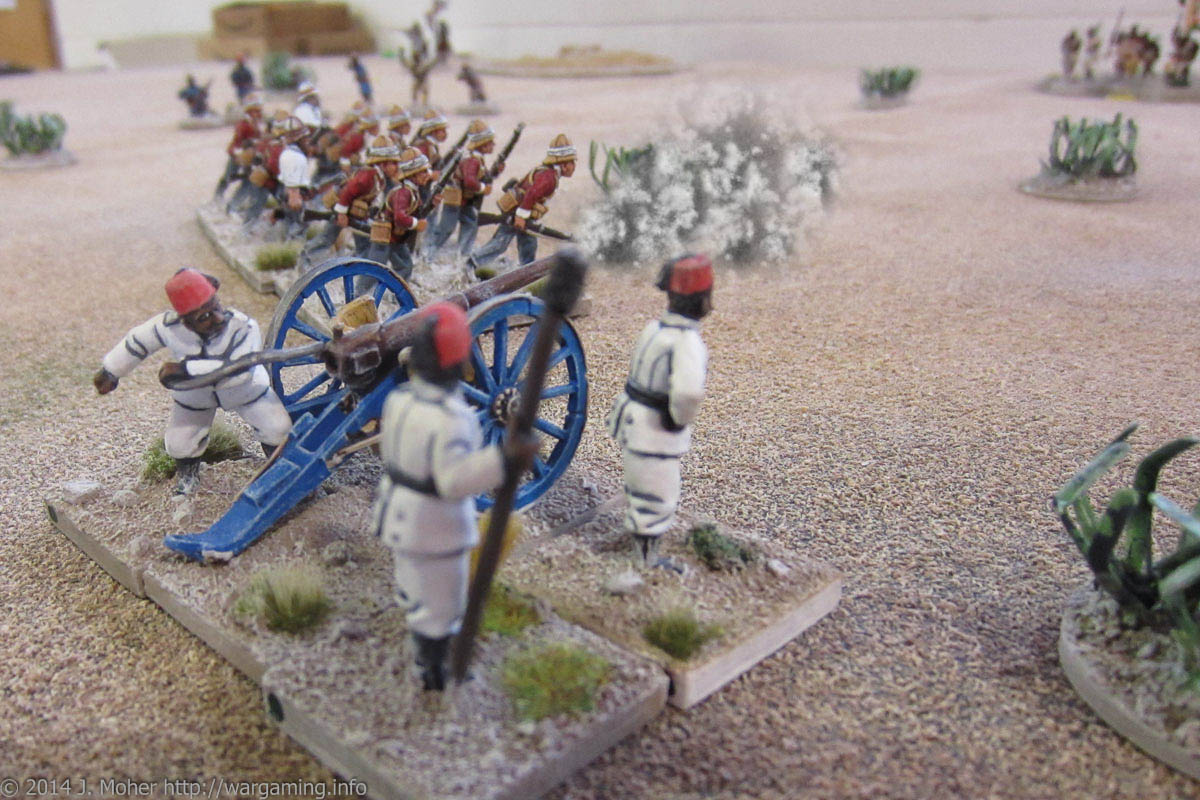
As Sir Henry’s column trudged towards Dongola, they were suddenly confronted by the presence of Dervishes approaching them from the South-West – these were Bazinger Riflemen, and likely a sign of the presence of more Dervishes, so the column rapidly began to expand out into battle formation. Even as the column started to deploy more Dervishes appeared to the South, directly in their path, and began approaching rapidly. These were Amir Sha’s Dongolavi ‘Red Flags’ and they were determined to stop the column from reaching Dongola! Valentine Scott’s 2nd MG Section of The Naval Brigade and Shawish Zulfakar’s 1/A Section of the Egyptian Artillery were the first into action – engaging the Bazinger Riflemen as they approached the column.

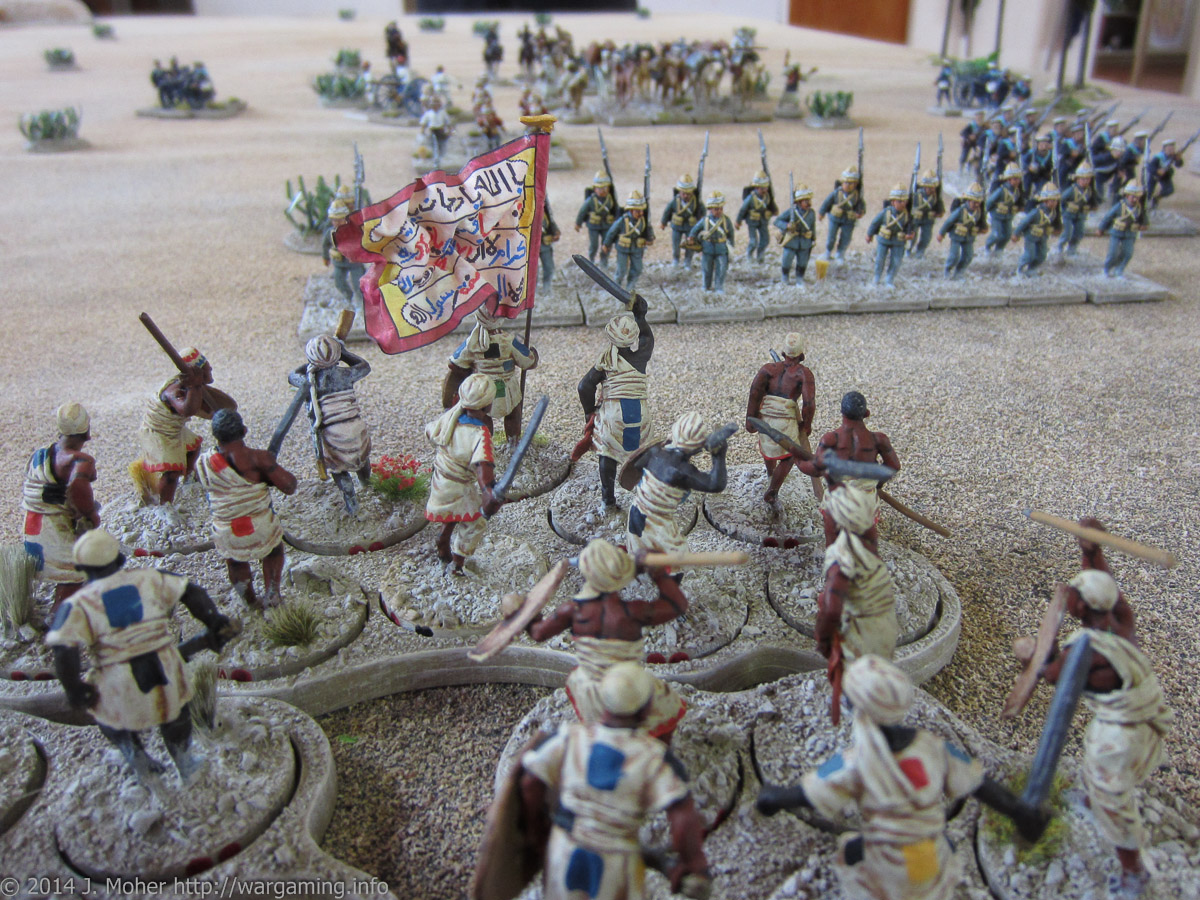
The 2nd Company, 19th Yorkshire meanwhile had rapidly deployed into line to cover the front of the column against the approaching Dervish ‘Red Flag’ Darrága, who had even more troops now approaching the Anglo-Egyptians (in fact the entire Rubá had arrived – all 3 bands of Spear & Sword armed Darrága and the ½ band of Rifle armed Bandága). Meanwhile out on the Western (desert) flank a body of Beja Fuzzy-Wuzzy Gamála (Camelry) came galloping in, bearing down on Scott’s Gatling Gun section and almost on top of them before they could react! The veteran 1st Company, 19th Yorkshire, under Willoughby Wilcox, now deployed to face this new threat (and the Bazingers), joined by Graf von Schnyder with his trusty hunting rifle! However the Mahdists’ weren’t finished yet, as still more Darrága arrived, again from the desert flank – this being the advance guard of Amir Yonus’s ‘Green Flags’… Even as they did Scott swung around his Gatling Section and poured accurate fire into the approaching Fuzzy-Wuzzy Camelry, causing great havoc amongst the mounted Hadendowah.
The 1/Yorkshire and Zulfakar’s 6pdr Krupp Section concentrated on the approaching (Western) infantry – both the Bazingers and the ‘Green Flags’ – while the front of the column prepared to be hit by the mass of charging ‘Red Flags’; Haversham Jones’ 1st MG Section, The Naval Brigade, went into action with it’s Gardner in support of the grey clad 2nd Yorkshire Company. As they approached still more Dervishes arrive – the balance of the ‘Green Flags’ come streaming in from the west, in support of their advance guard – Sir Henry now faces major assaults from two flanks. Thankfully Scott’s Gatling section have at least dispersed the Fuzzy-Wuzzy Gamála (inflicting heavy casualties in the process), temporarily securing the rear of the column…
The fire of the 2nd (grey) Coy, 19th Yorkshire manages to halt the first charge by the ‘Red Flags’ buying them time, as the ‘Green Flags’ advance guard smashes into the 1st (red) Coy, and the Bazingers begin to infiltrate between the two companies, firing into the 2nd’s flank. To make matter’s worse the 1st Section, The Naval Brigade’s Gardner decided to jam, allowing the stalled ‘Red Flags’ to avoid suffering heavier casualties as they attempted to recover from their initial repulse…
Meanwhile a vicious mêlée ensued between Amir Yonus’s ‘Green Flags’ and the 1st Coy, Yorkshire’s! The thin red line disappeared in a cloud of dust and swarming Dervishes, Graf von Schnyder was last seen on the flank, surrounded by hordes of the enemy, singlehandedly fighting like a giant before disappearing under a sea of Ansars! Elsewhere along the Yorkshire’s line the individual patches of red rapidly disappeared one after another, in a sea of dust and sand-white Dervishes – to finally re-emerge as just a tiny dash of red on the blood and corpse soaked desert…
The sand of the desert is sodden red, —
I trust Sir Henry Newbolt will forgive my re-wording (of his Vitai Lampada Cricket Poem).
Red with the wreck of the Yorks’ vanquished; —
The Gardner’s jammed and ‘The Graf’ dead,
And the regiment blind with dust and smoke.
The river of death has brimmed his banks,
And England’s far, and Honour a sobriquet,
But the voice of Sir Henry rallies the ranks,
“Stand fast! stand fast! and win the day!”
Even with all the exhortations in the world, it was a near run thing – only a handful of the 1st Yorkshire Company remained (literally that; just 2 effective other ranks, and about 4 wounded), the unit was leaderless, ‘The Graf’ was gone, and despite halting the initial Dervish attack there was now a gaping hole in Sir Henry’s line! With that the Red Flag Dongolavi Ansars surged forward again against the grey clad 2nd Company of the Yorkshire’s, and on the desert flank the full weight of the Green Flag Shaigiya Ansars surged forward to exploit the success of their leading band. Sir Henry’s right flank was stretched dangerously thin!
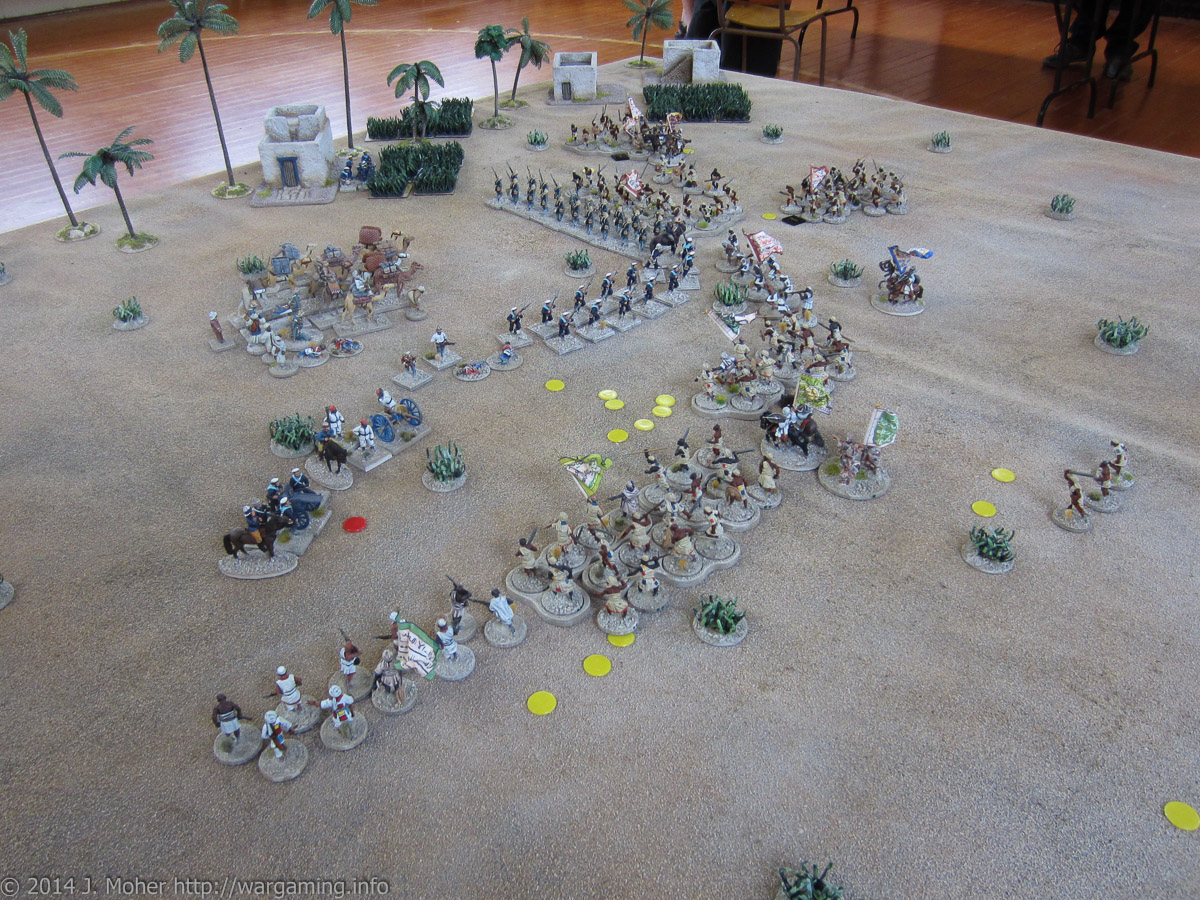
To endeavour to stabilise the line Sir Henry sends Sub-Lieutenant Goodall’s veteran but previously uncommitted 3rd Division, The Naval Brigade, across to plug the gap on his right and reform the line with the remnants of the Yorkshire’s – and just in time! Colonel Barnard personally joins the extreme right of the line alongside Commander Webber, who is holding it with the Gatling armed veteran 2nd MG Section, Naval Brigade, under CPO Scott and Zulfakar’s Egyptian 6pdr Krupp Section.
In a whirlwind of dust and bullets and yelling Dervishes accompanied by their incessant drums and trumpets Sir Henry’s column is almost overwhelmed – in the front the inexperienced 2nd Company, The Yorkshire’s holds and repels the attackers, but suffers heavy casualties (reduced to 35% effectives), on the right the veteran but reduced strength 3rd Division, The Naval Brigade are almost overwhelmed, hanging on with just 30% effectives remaining. However the worst was on the extreme right, where Commander Webber and CPO Scott’s Gatling Section were gunned down and overrun by the Green Flag Shaigiya Riflemen, and where Colonel Barnard & Zulfakar’s Egyptian Gunners narrowly avoided the same fate…
Then as suddenly as it began it was over – the Dervishes began to melt back into the desert as the small band of Green Flag Shaigiya Riflemen made one last probe into the rear of Sir Henry’s column, but with their ammunition depleted there was little they could achieve even against the now heavily mauled Anglo-Egyptians. So as they too melt back into the desert Sir Henry’s force collects itself on the battlefield, and it’s wounded and stragglers, it prepares to resume it’s march into Dongola severely battered, and in the following shape:
- C-in-C: Sir Henry Frotheringham & his ADC Colonel Rudolph Barnard [2m]
- 1st Company, 19th Yorkshire [2 + 4W] – No Officers or NCOs
- 2nd Company, 19th Yorkshire [7 + 6W] – Lieutenant Sebastian Huronoby-Middlegood
- 3rd Division, The Naval Brigade [6 + 6W] – Petty Officer Thomas McTavish
- 1st Section, Naval Brigade MG Battery [4 + Gardner] – Petty Officer Haversham Jones
- 1st Section, ‘A’ Battery, Egyptian Artillery [3 + Krupp 6pdr] – Shawish Hikel Zulfakar
- Column Baggage Train [10 Baggage Animals & Handlers + 2 Arab Guards]
- Doctor Ernesto Furtwangler (attached to Baggage Train/Hospital Corps)
It remains to be seen what sustenance & refuge Sir Henry will find in Dongola…
About The Game
All the terrain & figures are from my collection, except the Palm Trees which as usual were supplied by Kieran Mahony (6mm Wargaming), mine are, as always, still awaiting basing and detailing). The figures are mostly 28mm Perry Miniature’s, and several Castaway Arts, with a few Wargames Foundry and a handful of Old Glory. Buildings are Hovels.
Return to February 1884, Turn 04 of Revolt in the Sudan.
Our Correspondents’ Lithographs


One thought on “Fire & Sword Battle 06: The Gardner’s Jammed & The Yorks Vanquished”