A 1940 Mini-Campaign Setting for Spearhead (or similar)
The Defence of Florina and the Monastir Gap in Greece, 10-14 April 1941 is a simple mini-campaign setting for Spearhead and other similar scale rules sets (such as Command Decision) where the battalion is the manoeuvre unit and the basic element is a platoon represented by 1 model vehicle and/or a stand of figures. It is also usable with other rulesets such as Rapid Fire with minimal conversion.
It is set in Greece, as the Axis forces pour out of Southern Yugoslavia and attempt to drive down the spine of Greece, separating (Commonwealth) “W” Force in the central North from the main Greek Army in the West; and allowing the German forces to get behind the main Commonwealth force (6th Australian & 2nd New Zealand Divisions) in the East defending the Aliakmon Line (near Katerini & Mt. Olympus).

The campaign material provides a a map of the region suitable for several wargaming tables, a situational overview, and some general objectives for the opposing commanders. There are also extensive accurate OOBs for both sides at the scale referred to above. It is designed to provide a quasi-campaign setting where 2, 3 or 4 linked battles can be played as the Germans assault the Commonwealth Force ‘W’ and supporting Greek Divisions and attempt to breakthrough as quickly as possible while destroying Force “W’; while the Allies try to hold on as long as possible then withdraw as much as they can of “W” Force”.
Comprehensive campaign rules are not provided as it is assumed players will incorporate their own preferred system or home grown rules, or simply use a very simple abstract system to link each battle by having troops retire from one wargaming ‘table’ to another further back, and have reserves suitably positioned, etc. However some simple mechanics for some things are provided below.
Note that references to distances in inches assume Spearhead’s scale of reference (i.e. 1″ + 100 yards). Terrain and Weapon effects will reference Spearhead, but substitute your own rules stats for these if not using Spearhead. All references to dice refer to standard D6.

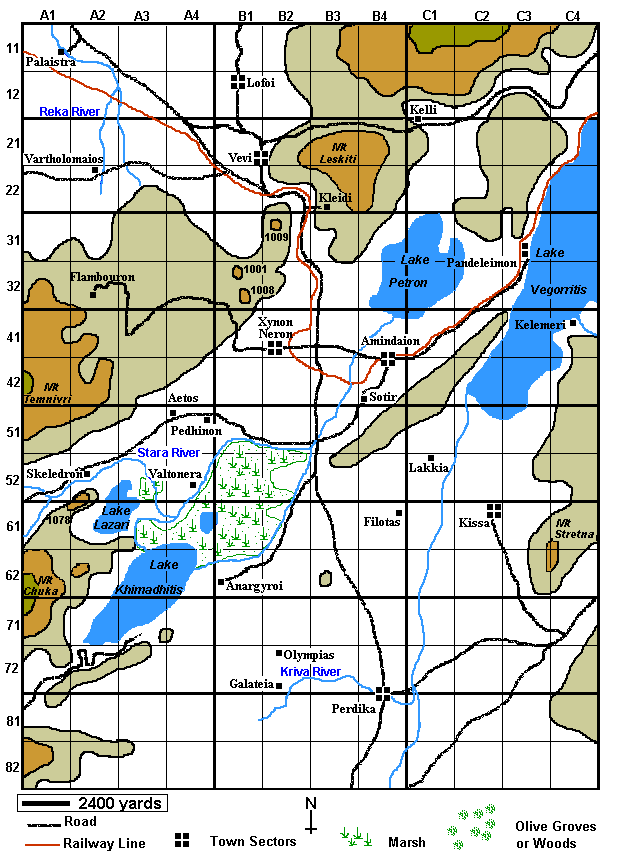
The Map
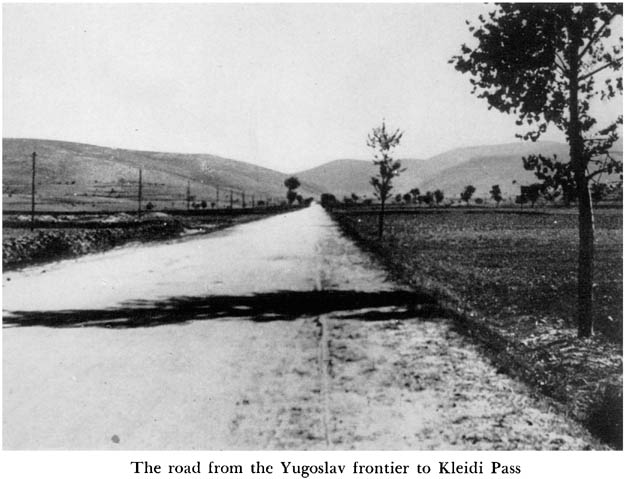
The Map represents the region east and south-east of Florina. Monastir is about 30km North along the road that exits B1-11. Florina is 10km west along the road at A1-22 or the Railway at A1-11; beyond Florina is then the Pisoderion Pass. The Klisoura Pass (and village) are about 10km west on the road at A1-52. Immediately South of the Map is Ptolemais, followed by about 25km of open plains before Kozani is reached. Edessa is 20km west along the road or the Railway C4-11/12, or about 40km via the road at C4-71.
SCALE
The grid on the map is set at 24″ (2400 yards). This is so the map will be detailed enough to lay tables out from and write orders on, but still allow it to be printed onto one page if desired. The assumption is that 8′ by 4′ tables will be used hence the “heavy” lines marking the boundaries of these. (8′ x 6′ being the ideal option, but 6′ x 4′ tables would be acceptable, although they may result in a Division (or Mackay Force) being spread over 2 or more tables.)
To directly access the map image for download click here (zip file).
TERRAIN
Mountains: Each contour on the map represents 2 actual contours on the wargaming table (a height change of between 500-750m)! So an observer on the maps 2nd contour will have a +12″ bonus to spotting ranges in the Spearhead rules. On the table (at 6mm scale) they should be represented as 2 contours with only approximately 1″-3″ between their edges as the majority of the slopes were fairly steep! The slopes are very barren and windswept with only low brush and scrub growing on them, while the top two map contours are also snow covered! Specific effects of these are:
1st Map Contour (pale green): Counts as Rough Ground (see Spearhead rules for effects on troops, spotting, etc).
2nd Map Contour (brown): Counts as Rough Ground, and is impassable to vehicles.
3rd Map Contour (dark green): Nominally counts as Rough Ground; but can't be entered and is impassable to all troops gor game purposes!
Lakes: There are 5 lakes on the map. These are effectively impassable to all troops.
Marshes: There are 2 marshes on the map. (See the SH QRS for the effect of marshes).
Rivers: There are several small rivers on the map. These should be represented on the table 1″ wide (in 6mm scale) with bridges/fords as indicated.
For Spearhead they may be crossed anywhere by Infantry (⅓ speed), Fully-Tracked Vehicles (⅓ speed) and Half-Tracked Vehicles (¼ speed). They are impassable to Wheeled Vehicles and Towed Guns except at crossing points. i.e. Infantry & Tracked expend 3″ of movement allowance to cross the 1″ wide river, Half-Tracks expend 4″.
Town Sectors: Each town sector is marked on the map. Most represent small villages, in some cases the smallest villages are not represented on the map. There are 5 large villages, represented by 4 town sectors each (straddling 1 or more roads).
Roads: Several are marked on the map, they are in varying degrees of condition, most are metal or rough Macadam, with only the main North-South road (B1-11 to B3-82) actually being of reasonable standard.
In Spearhead Wheeled Vehicles may claim a +3″ Road movement bonus, however no other troops receive any bonus for moving on a road (other than avoiding other terrain effects). For other rulesets apply a reduced move bonus for wheeled, and no bonus for tracked (other than avoiding other terrain effects). The roads were exceptionally rudimentary in this part of Greece in 1941.
Railway: Has no effect other than to provide bridges for crossing the various small rivers, and very low embankments which block visibility (cf. hedges in SH rulebook and QRS for effect).
Fields: These were numerous and there should be areas of these on the low ground of every map sector. Map Sectors with Villages in should be about 50% Fields. There should be a few ploughed fields, but mostly they will have young crops, be surrounded by rough stone walls and provide some spotting cover. (See the QRS and page 12 of SH for the effects of fields).
Olive Groves: None are marked on the map as there wasn’t much in the way of trees and such in the Florina Valley. Small copses (3″-4″ diameter) may be randomly scattered on tables if desired, but should be no more than 1-2 per map sector, perhaps 3 per sector if a river or lake is present (with at least 1 of them adjacent to the water).
They also may only be on the flat (there were absolutely no notable groups of trees on the high ground based on the historic photos of the campaign and other information).
Treat as very small Woods as per SH QRS (e.g. should only big enough to hold 1-3 stands each).

Weather
Throw a D6 after Midnight each day to determine the weather; throw a second time at Midday to determine if any change during the day:
+1 to dice if the previous 12-hours was not Heavy Snow.
5-7 = Fine Clear Weather.
2-4 = Overcast with Scattered Snow and/or Rain (No Aircraft)
0-1 = Heavy Snow (No Aircraft and all spotting ranges halved)
Heavy Snow may also optionally affect movement of troops on contours (high ground), especially on foot, horse drawn or pack animals. Players (or Umpire) may decide how to implement effect, if any. Historically the Australian & NZ Troops (and presumably attached UK units) on the high ground in the snow suffered a lot of hypothermia & frost bite being equipped with only their lightweight desert uniforms (from being in Egypt) and greatcoats (all they could carry – very few blankets and no thermal clothing or European theatre uniforms were available or issued at the time).

Orders & Movement
Orders for units are given exactly as in normal Spearhead games, however instead of the table units move on the map.
(If not using Spearhead use orders as your preferred rules requires them – if it doesn’t you will need to devise a system. Spearhead uses arrows drawn on maps to denote the centreline of the advance for each battalion, with individual stands/platoons able to go up to 12″ from the HQ which must follow the arrow).
Once units enter adjacent sectors they will be assumed to be aware of each other and the umpire should decide whether the action gets transferred to the table top! The Umpire will also need to allow for observers on high ground. Exact locations of supporting artillery battalions should also be marked when those units are deployed for action. Some German artillery units can be deployed just off the northern map edge but this should be severely restricted – as historically the Germans struggled to bring their troops forward due to the poor road system.
Each day is as follows:
0630 Dawn (1 turn),
0700-1630 Daylight (up to 20 turns),
1700 Dusk (1 turn),
1730-0600 Darkness (26 turns).
(Dawn and Dusk halve spotting distances after modifiers).
Each turn is 30 minutes, during daytime to simulate that units may not automatically move continuously at full speed – for each side throw as follows to see how many turns of movement their units may make on the map – the rest of the daylight time is assumed lost in traffic jams, logistics issues, etc. Once on table in a battle units will move as usual regardless of how many moves are available. The daily move rolls are:
Germans: 3D6+2 Daylight Turns for that day
British & Commonwealth: 2D6+3 Daylight Turns for that day
Greeks: 3D6+0 Daylight Turns for that day
There will obviously be a difference in the number of turns, so you will need to prorata the turns (e.g. if Germans have 18 and Commonwealth 12 then after both sides have 2 turns the Germans get a third, then both sides do 2 again, etc).

Night consists of 26 turns, but troops may only conduct a random number of moves, to allow for the difficulty of night movement, and the need for troops to rest and replenish. Each side throws to see how many moves it successfully completes at night. The Germans throw 1d6 (i.e. they get 1-6 moves), the Anglo-Greeks 1d6+2 (i.e. 3-8 moves). The difference is intended to reflect the Anglo-Greeks reliance on darkness as cover for when they made major withdrawals. No combat can be fought at night, units that “bump” into each other will halt and await dawn (they may choose to break-off if desired, but will retreat in a direction randomly determined by the umpire).
Any troops moving at night and not following a clearly defined terrain feature (eg. Road, River or Contour Line) may move in the wrong direction, at the start of every 3 turns movement (or part there of) throw 3+ otherwise unit becomes lost and deviates in random direction (Throw d6, 1 = 45º Left, 2-3 = 30º Left, 4-5 = 30º Right, 6 = 45º Right).
At the start of each night new orders may be issued to every Battalion (throw 2+ for Germans, throw 3+ for Anglo-Greeks), including whether unit is to move at night or not. Other order changes may only be made during the 20 moves of daylight subject to the usual SH rules. Attachments may also be changed at this time between battalions in the same map sectors (This is the only time attachments may be changed). Attachments may be made in anticipation of units due to arrive “on map” during the following day (but remember until they are “on Map” they don’t count for Morale, etc…)
No flank marches may be made (they will occur naturally during the game). Only the Germans may have reserves, by holding units “Off-Map” immediately North of their entry points after their designated time of arrival.
The campaign starts at 1200 on the 10 April 1941 and ends at 2400 on 14 April 1941 (so lasts 4½ days).

Field Fortifications
Any Infantry (and Medium Mortars & HMGs) of either side that remain stationary for a period of 4 turns or more (e.g. after having moved), and have not been under direct fire or in close combat, will be assumed to have had the opportunity to have dug Foxholes/Gun Pits (-1 Light Cover) if they desire.
Heavier Light to Medium Weapons (e.g. 37mm-50mm Anti-Tank Guns, Small 65mm-75mm Infantry Guns, Single Barrel 20mm AA Guns) will be assumed to have this ability if they have remained stationary for ½ a day (or overnight).
Briefings, Orders of Battle & Initial Deployments
- German Briefing, OOB and Initial Deployment
- Anglo-Greek Briefing, OOB and Initial Deployment
- Spearhead Greek Datacard

Victory Determination
The campaign ends once two German Battalions have exited off the Southern Map edge between B1-C4; and triggers immediately at the end of the (Campaign or a table top battle) turn it occurs. For a Battalion to count as exited they must have exited 5 fighting stands; or at least 3 fighting stands (i.e. 1 company) and their BHQ. Attached support stands (e.g. Anti-Tank Guns, FlaK, Engineer Platoons, Recon or Armour) count as fighting stands for this purpose.
It’s suggested to calculate the level of victory determination using values as follows (note: Mackay Force is considered to have 5 “Fighting” Battalions for this purpose: 2 armoured regiments, 2 Australian infantry, 1 Motorised infantry):
+1 point for each of the 21st Greek Brigade Battalion still holding their original starting positions.

+2 points for each "Mackay Force" Fighting Battalion exited off the Southern Map edge between B1-C4 after the 11th April, or
+1 point for each "Mackay Force" Fighting Battalion still intact and south of map "latitude" 71 inclusive, after the 10th April.

+2 points for each Dodecanese Fighting Battalion exited off West Map edge between map "latitudes" 51-62, or
+1 point for every Dodecanese Fighting Battalion still intact and West of map "longitude" A4 inclusive.

+2 points for each German Fighting Battalion eliminated.
-1 point for each Anglo-Greek Fighting Battalion eliminated.

-8 points if Campaign Ends on a turn during the 10th or 11th of April.
-5 points if Campaign Ends on a turn during the 12th of April.
-2 points if Campaign Ends on a turn during the 13th of April.
-1 point if Campaign lasts until 2400 on 14 April, but 1 German Battalion has exited the map (0 if none have exited).

20+ is a Major Anglo-Greek Victory.
15-19 is a Minor Anglo-Greek Victory.
7-15 is an Historical Result (Draw - but German Strategic Victory IRL).
4-7 is a Minor German Victory (Tactical Improvement vs. History).
3 or less is a Major German Victory and a catastrophe for the Commonwealth forces (i.e. Major Tactical & Strategic Victory).
Historically the Germans were in Katerini by 14 April, well south of Florina, and most of Mackay Force was back with the main Anglo-ANZAC force between Mt Olympus and Larissa retiring south across the plain.
I hope to add a downloadable PDF version of the campaign here in near future.

Designers Notes
This is intended as a mini-campaign gaming resource and as such has not been extensively play tested, so the victory conditions and some other aspects may need fine tuning. The OOBs and events are modelled as closely as possible on the real ones, the German and Commonwealth TO&Es are the historical ones modelled as accurately as possible; The Greeks are a best guess from available information. The German OOB and order of arrival is based on the known facts but includes some assumptions (such as bridging units being already used previously to cross the Crna River).
Bibliography / Sources
- German Kriegsgliederung (Official German records of all unit organisations, type and quantity of weapons & equipment) – Special thanks to Wig Graves for his help with these.
- Panzertruppen – Jentz (confirmation of the number of Tanks in the German units).
- Australia in the War of 1939-1945: Greece, Crete and Syria – Gavin Long – You can access a free PDF version of the Florina chapter of the Australian Official History at Chapter 3 – The Rearguard Actions in the Florina Valley.
- Official History of NZ in the Second World War 1939-45: To Greece (2nd Division) – W. G. McClymont – you can read this section of the official history online from the NZ Electronic Text Collection at Chapter 9 — The Monastir Gap: The Assembly of Mackay Force: 8–9 April and the subsequent sections of the history (there are 11 sections to this chapter).
- Official History of NZ in the Second World War 1939-45: 27 (Machine Gun) Battalion – Robin Kay – You can read the Chapter covering Florina online from the NZ Electronic Text Collection at Chapter 3 — The First Encounter.
- Greece 1941: The Death Throes Of Blitzkrieg – Jeffrey Plowman
- Images Of War: The War In The Balkans – The Battle For Greece And Crete 1940-1941 – Jeffrey Plowman
- The Gods Were Neutral – Robert Crisp (Memoirs of Greek campaign by squadron commander in 3RTR)