Following on from our two previous outings with Maurice (see Maurice: First Game Impressions and Maurice: Second Game & More Thoughts), Cam and I decided to have a go at a historical refight – deciding on Blenheim, so last weekend we set to it It would be heavily “Bathtubbed” to fit it down to the size of a typical Maurice game, and we’d be playing with all the full rules (rather than just the free Maurice Lite version). This meant we’d have troop quality, enhanced morale, and other factors involved. We both calculated out separately what size we thought the armies would be in Maurice – I based mine on the battlefield size & frontage and came to about 32 units of Infantry & Cavalry for the French (the larger force), however this was clearly too big so halving that came to 16, about the right size, and co-incidentally the same amount Cam had calculated starting with the troop numbers and working from that direction.


Scaling meant each Maurice (pronounced “Morris” by the way) unit would be approximately 3,500 or so men* – for the sake of simplicity we didn’t try to distinguish between the frontages of Infantry or Cavalry units and assumed all worked out roughly the same. Artillery we arbitrarily assigned a 30:1 ratio so we had 2 Confederate & 3 Franco-Bavarian artillery units – although 20:1 might have been more apt (giving 4 and 3 respectively). For command we assigned the C-in-C’s as Captain General John Churchill, the future Duke of Marlborough, for the Confederate Allies, and Camille d’Hostun de la Baume, Duc de Tallard, Marshall of France for the Franco-Bavarians. Prince François Eugène of Savoy was added as a ‘Notable’ to the Confederate army (with an ability that would aid activating his force to move regardless of how far away Churchill was), while on the Franco-Bavarian we decided to subsume Prince Maximilian II Emanuel Wittelsbach Elector of Bavaria, and Ferdinand, Comte de Marsin, Marshall of France, into Marshall Tallard rather than provide them with one or two notables (basically we were concerned the battle would be one sided and the French would easily deal to the Grand Alliance Allies).
* each Maurice “unit” therefore equating to about 7 Confederate Allies or 6¼ Franco-Bavarian Infantry Battalions, or 24 Confederate or 33 Franco-Bavarian Cavalry Squadrons. The 12 Squadrons of dismounted French Dragoons between Blenheim and the Danube were included in the French infantry total.

The Armies
Confederate Allied Forces of the Grand Alliance
9 Infantry: 2 ‘Elite’, 7 standard.
6 Cavalry: All standard.
2 Artillery.
Superior Volley Fire (army bonus)
Franco-Bavarian Army
12 Infantry: 1 ‘Elite’, 11 standard.
4 Cavalry: 1 ‘Elite’, 3 standard.
3 Artillery.
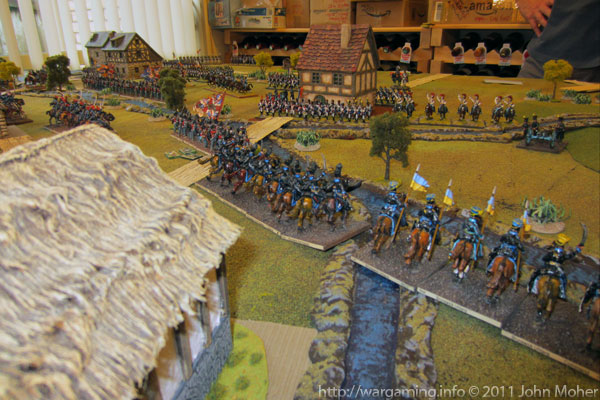
Deployment was arranged to closely resembled historical deployment, and units were organised to approximately equate what was present (e.g. Cutts’ column attacking Blenheim had ~9900 infantry so we assigned 3 Infantry units for that). The 2 ‘Elite’ Allied infantry units were the leading unit in the Blenheim column (British Foot Guards, etc), and the unit in the centre representing the Anglo-Dutch under the Prince of Württemberg-Neuenstadt attacking Oberglauheim. For the French the infantry was deemed to be the unit immediately in reserve behind Blenheim (in hindsight it probably should have been the unit in Blenheim itself), and the cavalry the unit on the right immediately adjacent to Blenheim (representing the Gendarmerie de France, etc). As previously we were constrained to use Napoleonic figures as we lacked any 28mm WSS troops (for the moment anyway) so you’ll have to forgive us once again for using anachronistic troops! Using the enhanced morale in the full rules the French had a small morale advantage over the Allies.
Both armies also had a nominal objective in their rear areas that in the event of an enemy breakthrough overrunning it would provide an effect on morale (thus to allow for the possibility of a cavalry breakthrough or such like).


The Start
The game began with the troops deployed at the moment that Cutt’s column has crossed the Nebel Stream, and is in range of the French while awaiting Eugène’s troops to commence their attack on the far right. Ignoring Churchill’s historical plan of attack I left the troops outside Blenheim to pursue a Musketry duel with the garrison until an opportune time presented itself for an assault. Instead I opted to make the initial effort in the centre, with 2 infantry units crossing the Nebel to put pressure on the French cavalry and the Anglo-Dutch unit moving up to engage the Oberglau garrison in musketry across the Nebel (I played an event card to enable 2 forces to be activated in the same round). Ongoing volley fire at Blenheim, in the plain between, and at Oberglau then ensued, including the French artillery supporting both villages, followed by French cavalry charges (incl. the Gendarmerie de France) in the centre plain. Assisted by a “Thunderous” card this latter successfully assaulted the 2 Allied infantry, inflicting 2 DISR (Disruptions – accumulating 5 breaks a unit of Infantry or Cavalry), but as we have seen (and was fairly historical in this period), they were unable to outright defeat such fresh infantry (which often was the case in the later Napoleonic era). The French cavalry fell back and were progressively cut to ribbons by the Allied musketry while the latter gradually rallied their line back to impeccable order. First blood to the Allies with 2 French units destroyed, and the corresponding morale loss.


At this point the French had some success and the Anglo-Dutch unit attacking Oberglau was destroyed by volley fire from the garrison & canister from the supporting artillery – effectively ending any further attack on that place. The losses were now Allies 1, French 2 – and the morale near even. However the Allies were putting pressure on the Blenheim defender, racking up numerous DISRs and threatening to destroy the unit.


The Middle
The breaking of the French cavalry in the centre was soon followed by the breaking of the Blenheim garrison as well – it succumbed to a charge by the Elite British Guards and co who had reduced it to 4 DISRs from volley fire, and the ensuing charge ensured its destruction regardless of the result – Blenheim was open to Allies, although they declined to enter! Losses were now Allies 1, French 3, and the Allies had a reasonable morale advantage.

The French now advanced their second line in the centre – all the action was still focussed east of Oberglau – on the western flank nothing had yet happened, Prince Eugène of Savoy had not moved (mainly due to not being able to spare any activations for that flank). Both Captain General Churchill & Marshall duc de Tallard were being very energetic – regularly moving their headquarters close to the current scene of the action (something we hadn’t really done in our previous Maurice games – this made prolonged activity in one area of the battlefield much more viable and cost effective by shortening the command span for activations). A major fire fight now broke out in the central plain between the Allied infantry and the advancing French second line.

The net result was both Allie units were eventually overwhelmed by musketry and destroyed, but not before one of the French units also was. Casualties were now Allies 3, French 4, and with the French getting a Heroic Event card to boost their morale everything was all back pretty even!

Resorting to dastardly tactics I took advantage of the French success and whisked out a ‘Confusion’ card – allowing me to march one of Cam’s units – which resulted in a lone French infantry unit stumbling across the Nebel to the Allied side and wandering up in front of the Allied Second Line of 3 Cavalry units! Needless to say the Allied cavalry immediately pounced, and the French infantry, already heavily disordered from the prior fire fight and the passage of the Nebel Stream, were quickly dispatched… (Actually when I moved Cam’s unit I should have left it partially in the stream, which would have made it even more difficult for it to defend against the cavalry). Casualties were now Allies 3, French 5 – morale favoured the Allies again, but not by much.

As the middle part of the battle neared it’s end action finally commenced out west, Eugène’s Dane & Prussian infantry advanced, countered immediately by the Franco-Bavarian infantry – a prolonged volley fire fight ensuing… Marshall Tallard quickly relocating to this side of the battlefield.

The End
While the prolonged roll of musketry was heard from out west in the centre I now advanced what I hoped would be the telling blow, a single French infantry unit and 2 artillery units covered the entire gap between Blenheim and Oberglau, I proposed to advance my entire second and third line of Allied Cavalry in the east & centre (totalling 4 units) to overrun the infantry, then roll up one or both of the artillery units, and then advance into the French rear to overrun their objective – victory was virtually assured…

My Allied cavalry promptly crossed the Nebel, and advanced on the lone French infantry, while on the right Eugène’s volley fire had decimated another French unit – to which Cam (Marshall Tallard) responded to with a further advance bringing the French west flank second and third line infantry forward to replace the broken first line. The French were really getting not trouble now, they had had a “Death of a Hero” card as well, which negated the earlier heroic moment, and the casualties were now Allies 3, French 6 and the French morale was getting pretty low…

Now was the time to hopefully decide the battle – the Allied cavalry in the centre charged, two units with a third in support endeavoured to run down the sole surviving French infantry, while the fourth cavalry unit (the third line reserve from the Blenheim attack column) advanced on their flank ready to charge the French artillery battery alongside Blenheim. And then Cam whipped out the dreaded “That’s Not On The Map” card – oh dear… (You may recall me playing that at the start of our previous Maurice game). Effectively this meant a small patch of marshy ground or similar was immediately in front of part of the French infantry and both my cavalry had crashed into it – they suffered a DISR each for charging through it (added to the DISRs they had suffered from the French volley fire), fought the melee at a severe disadvantage and lost, incurring more DISRs, and then suffered another DISR each for retreating through the marshy ground when they retired from the combat. One unit was immediately destroyed by that final marsh DISR, and the other quickly dispatched by subsequent volley fire… To add insult to injury the lone artillery unit beside Blenheim shot the fourth Allied cavalry unit to pieces with canister, resulting in 3 units lost in short order! The Allies had gone from only needing to destroy about 2 French units to win, to themselves only being 2 units from defeat! Losses were now Allies 6, French 6, and morale was almost even (and very low).

Out west the fire fight continued, the Allies had success when Eugène’s artillery decimated the Bavarian Cuirassiers, but this was promptly followed by the destruction of Eugene’s leading Danish infantry unit. Casualties were now Allies 7, French 7, and both sides morale were only the loss of 1-2 units from breaking (the French now having a very small advantage). Back in the centre the staunch remaining French infantry unit volley fired into the remaining Allied cavalry and emptied their saddles – with that loss the Allied morale collapsed and the battle was over… The French had won, just, what was likely an improbable victory two-thirds of the way through the game, having come back from the Allies having ~47% of their Morale to the French’s 17% for the French to have survived with the 17% remaining when the Allies reached 0%. Final casualties were Allies 8/17, French 7/19, plus the French had had both positive and negative morale events. Excluding set-up we’d completed the whole battle in just under 2 hours playing time.

Thoughts & Musings
Was it Fun? Yes. Did it feel like 18th Century or War of Spanish Succession? Yeah, pretty much I think. Was it Historical? Hard to say. But it was an interesting learning experience, and due to the enforced historical deployment presented a whole new series of challenges under Maurice (e.g. the dispersed multiple small forces of units – compare our two previous games mentioned at the start of the post). It also did have a touch of that ‘old school’ kinda charm you associate with Charles Grant, Brig. Peter Young, etc…

Do it again? I think it actually worked okay as a refight – it was heavily ‘bathtubbed’. We used an 8’ x 5’ table – ideally you’d probably want to do it on about a 10’ x 6’ table allowing about 24 Infantry & Cavalry units a side (and 3-4 Artillery), which would give a little more flexibility in the deployment, and I’d suggest the 2 or 3 units representing the French reserves to the South-East of Blenheim being off-table (their entry being controlled by a compulsory event card, but one which includes say a 50% chance they will automatically march in column straight into Blenheim village at the urgings of Lieutenant General Philippe, Marquis de Clérambault). I’d also suggest there needs to be an objective of some kind in Blenheim itself to provide an incentive for the Allied troops to actually enter – in Maurice moving into or through towns is hard work and very disruptive, so no one will voluntarily do so unless they get to deploy already garrisoning such to start with. We made some arbitrary decision about where units went (in fact while the Allies were fairly straight forward Cam and I didn’t completely agree over the French but Cam graciously acceded to my view of things at the time), the reserve unit immediately behind Blenheim, and the one in the back half of Oberglau obviously both being pretty wasted and ineffective. We both expected the Allies to really struggle pre-game, yet afterwards it seemed the Allies had a fairly easy chance of success, and the French struggled principally due to their deployment being especially difficult to manage under Maurice – but then perhaps that’s historical in a roundabout way…

Getting back to Maurice the “That’s Not On The Map” magic terrain card can be pretty decisive – as Cam says it might get old quickly – it probably will need to be something that’s removed from the deck for some games so it doesn’t always appear every game every time… We were much more dynamic with our C-in-C’s – burning a card to relocate them regularly to where your key action is is the right way to operate – and changes the way you view he cards (e.g. activation spans become less critical). The cavalry still seemed a bit stodgy, but it’s not unhistorical, Blenheim was never a battle where large sweeping cavalry attacks occurred on the flanks, but some sizable charges did occur in the centre and on Eugène’s flank – which we struggled to replicate. The actual historical mix of cavalry actually seems at odds too to the battle accounts, so it’s hard to say what’s really a historical result… One major positive for me is I think this game marked an initial watershed for getting my head around the rules and mechanics – I started thinking quite dynamically about where to focus effort, and maximise effect, and where necessary to hold off a charge for a round and rally instead to rebuild my hand, then charge, rather than risk a combat with a depleted hand an no way to activate units afterwards if it went wrong… Still have figured out when you’d use Bombard with artillery though… (need to play a game with 3-4 artillery units concentrated together in a large battery).
Read More: We gave Blenheim a second bash a week later…
Great report again and very much wetting the appetite for this intriguing rule set. Thanks for this
Thanks Gary and I’m glad you like it. It certainly is a rule set that grows on you!
A very entertainign report; thanks. Makes me curious to try Lasalle…
Thanks Simon – although we are talking about Maurice not Lasalle! 🙂 Lasalle is quite a different game – see my Napoleonic Game Reports.
P.S. Or were you referring to the fact that Sam Mustafa is also the author of Lasalle as well as Maurice…?
Nice looking buildings. 🙂
Cheers Mate! And yes you did a good job! 😉
Refighting Blenheim, perhaps try it as 2 commands per side. With Eugene vs Marsin and Marlborough vs Tallard
Nice report John. I have been looking at the light version of Morris and am suitably impressed. Your refight has given me some encouragement to lift my Tricornians up the priority somewhat.
Great battle report. I laughed, I cried…
Dale
Thanks Dale 🙂 It was certainly a bit of a topsy turvy game – I was so sure I had Cam on the ropes! Hope you had a great Christmas and all the best for 2012!
Can Maurice handle multiple players per side?
Yes it can. But ideally you need multiple card decks and run each side as multiple commands or armies with an opposing command/army.
I do think that there is a lsight problem with Sam’s rules (it is similar in Might and Reason) with cavalry being too “stodgy” as you put it. In Maurice this could be reduced with a DYO card along the lines of “brilliant cavalry charge” – one unit or command?! transfers its 1 Dissorder received if it wins the combat to the opposition.
I tried my idea of a DYO card for Brilliant cavary charge yesterday in a game with a friend of mine and it worked as I had hoped. The ideal was waiting to get Stirrups in and the DYO card in your hand. Charge with stirrups in and with any luck inflict 2 Dissorders to the opponent whilst taking one and then charge again in your next turn playing Brilliant cavalry charge. If you win again, and the enemy hasn’t rallied or otherwise tried to sieze the initiative back from you the 2 Diss from attack one and the 3 from attack 2 will destroy his unit for the cost of one Diss to your unit. This seems fair to me as some luck in the dice is still required but any cavalry leader who sits on the defensive allowing his opponent to attack twice deserves to be swept form the field and more importantly it felt more like 18th C cavalry fighting which wasn’t a matter of attrition. The best cavalry leaders launched lightening strikes at just the right moment and would destroy thier enemies with very little loss to themselves.