Recently I finally got my Brunswick Corps close to completion (well barring the grass for the bases, and the 3 Brigade Commander figures) and Cam and I were overdue for another larger game akin to The Crossroads (that we had played several months ago) – so it seemed a good excuse to give them their baptism as an entire corps. This time we went a fraction smaller than that game, but a little larger than a standard Lasalle AB List Game, with the forces selected using an updated version of Cam’s Lasalle Points System originally posted on the AWC Website. The purpose was to try a game with about a reinforced Division (e.g. an Infantry Division with Cavalry Brigade in support) a side, test out the points amendments (especially regarding on-table cavalry), and play a scenario from Charles Stewart Grant’s Table Top Teasers or Scenario Books. This is what happened about three weeks ago…

Note the photos here aren’t as good as they could be I’m afraid – my Brunswickers had only just had their final gloss lacquer coat for protection (so hadn’t yet had their ‘dullcote‘ style matt coating) and I was using my camera hand held with external flash so it did result in a bit of shine or reflection in some photos – but hopefully they are good enough to get a good view and sense of the game…
The Scenario
I selected the scenario “Dominant Hill” from C. S. Grant’s 1981 “Scenarios for Wargames” (Scenario 40, Pages 97-98) as this was a fairly simple encounter style battle for use with roughly equal forces so was easily adapted to our Lasalle points-generated forces. The table layout needed to be distorted to better suit our game (i.e. playing across the width rather than down the length as in the original scenario). The scenario calls for the two sides to enter from (and along) roughly opposite roads, converging on an offset intersection overlooked by a major hill at one ‘side’ of the table and with a small village strung out along the road either side of the intersection; in addition there were 3 small woods or copses, and a second low ridge or kidney-shaped hill. For our game I turned the map 90º and then stretched it out so the large dominant hill now ran along a short edge, rather than a long one, and simplified the village down to just 2 significant buildings – you can see how it looked in the photo below.
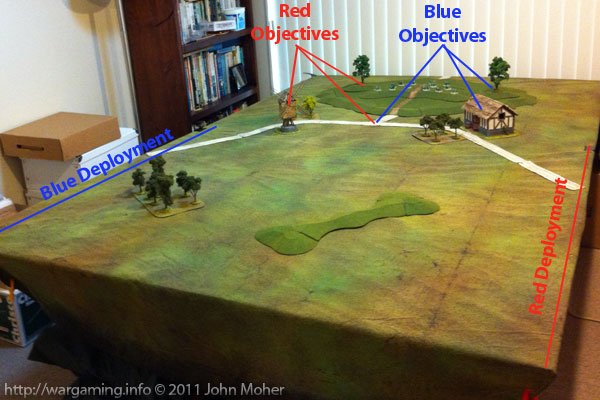
Scenario Deployment & Objectives (for Lasalle): For the game sides would be determined randomly – blue & red each getting one long side of the table. Initial deployment (and entry of any reserves) would only be permitted in the first half of the table edge (i.e the half furtherest from the dominant hill). The first move advantage would also be assigned randomly to one of the sides, when deploying the side with first move would deploy up to 6BW (Base Widths) into the table, and would place the first brigade on the table, the side moving second could deploy up to 8BW in, and deployed a brigade second. Brigade deployment then continued alternately until all on-table forces were deployed (any on-table non-brigaded troops directly under the Divisional Commander being deployed last by each side). In our game the French side was deemed South and the Anglo-Brunswick side North, making the dominant hill at the West end of the table, and the deployment zones at the East end.
Each side had 3 objectives – one was a common one (the road intersection), the other 2 were the corresponding building and highest point of the hill on the opposing side of the table (see the photo of deployment showing the deployment zones and objectives for our game). Both sides were endeavouring to march their forces down the road heading off table beyond the dominant hill, so these were deemed the key features to secure the passage beyond the hill. The game runs for the standard length of a Lasalle game, and any Reserve Brigades (off-table troops) arrive as normal reserves.
Terrain: The upper contour of the dominant hill (including the objectives there) is rough going (i.e. affects movement & a firers musketry but provides no cover for target); while the Woods/Copses/Orchards are also rough going that in addition provides soft cover. The buildings are wooden so provide soft cover and can hold 1 infantry unit each.
Red (Anglo-Brunswick) & Blue (French) Forces briefings (identical): Somewhere in southern Belgium and due to a sudden change to the axis of advance you are the commander of the Division that is now the Advance Guard for the main army. Enemy forces are known to be within a few leagues of your position and possibly shadowing you (although your cavalry piquets have not as yet reported anything of significance). Your orders are to move to a minor settlement at a key road intersection (when your axis of advance and the suspected enemy one converge), your orders are to secure that intersection & it’s immediate surrounds (the buildings and dominant high ground the road passes amongst and over), with the object of allowing passage of the army to continue along the road beyond on the morrow! Do not fail!
Victory: A Decisive Victory will be deemed to occur if (a) either side has undisputed control of all 3 of their objectives and neither side has broken at the game’s end, or (b) if the opposing side fails a Army Morale Check prior to the games end. Also during the game if either side has undisputed control of at least 2 of their objectives this compels the opposing side to take army morale checks (even if not reduced to point a check would normally be made), and with reduced number of dice, exactly as described on Page 67 of the rulebook for a normal objective (except in this case there are 2 needed to force the check) – note it could be possible in very unusual circumstances for both sides to achieve this simultaneously during the game.
The Game
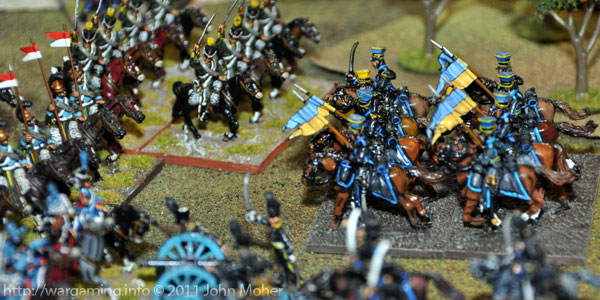
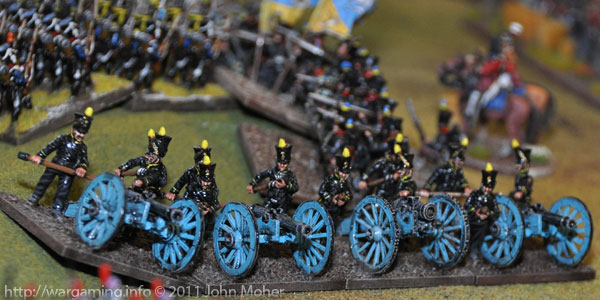
Set-Up & Turns 1 & 2: Having thrown randomly for sides and first turn, Cam got the side marked blue in the photo and also got first move. We deployed as depicted (there is a full gallery set of large turn by turn photos at the bottom of this page), Cam’s side was South, and mine North – the dominant Hill was therefore the West end of the table. Running East to West Cam deployed his 2nd (Infantry) Brigade (which included the 1er Régiment de Ligne who he had designated as Valiant due to their status as one of the top line Regiments of the French Army, the 1/1er Bataillon d’infanterie de Légère , and Barbaux’s 6pdr Foot Battery) to cover the open flank, in the centre his Light Cavalry Brigade (1er Hussars, 1er & 6e Chasseurs à Cheval, 5e Lanciers Légère, and Gronnier’s Horse Battery), and deployed to advance on the objectives the 1st (Infantry) Brigade (with 5 Bataillons of the 2e & 3e Régiments d’infanterie de Ligne). My Brunswickers deployed similarly, my smallest Infantry Brigade (the 2nd Linie with 3 Bataillons and Moll’s 6pdr Foot Battery) deployed to the East to cover the open plain opposite the French 2nd Brigade, the Brunswick Cavalry and Avante Garde Bataillon (supported by Heinemann’s 6pdr Horse Battery) deployed in the centre, and the 1st (Leichte) Infantry Brigade headed for the objectives (with the Leibgarde and the 3 Leichte Bataillons) – Pack’s 8th British Brigade was in Reserve (ostensibly the next available unit in the order of march approaching the battlefield). Both sides initial moves were similar, with the 1st Brigades rushing West to contest the High Ground & Objectives, the Cavalry heading out into the centre to interdict the opponents movement, and the 2nd Brigades in the East advancing to support these moves. The only notable action was that both Brunswick Artillery Batteries deployed into gun lines while the French Batteries were still well to the rear behind their Infantry & Cavalry columns.

Turns 3 & 4: The French went immediately on the attack with the 1er Régiment de Chasseurs à Cheval and 1er Régiment de Hussars charging Heinemann’s Horse Battery; while the 6e Régiment de Chasseurs à Cheval and the 5e Régiment de Lanciers Légère endeavoured to box-in the Uhlan Schwadron (which I have modelled as a small Regiment in Lasalle due to it’s real-life size of over 230 men and the very large real-life size of the Hussar Regiment which makes it at the very maximum of ‘large’ for a Regiment in Lasalle). Elsewhere their columns reached the lower slopes of the Western hill, and in the East the 2nd Brigade diverted it’s advance and began redeploying to face the Brunswick Linie Brigade, while Barbaux’s Foot Battery deployed in the centre to support both them and the cavalry and Gronnier’s Horse Battery deployed covering the road intersection. Heinemann immediately struck camp and his battery came galloping back pell-mell through the Brunswick 2nd Hussars, who were then hit by the French Hussars & Chasseurs! The Brunswick Hussars stood their ground, initially be pushed back but then themselves charging the 1er Chasseurs à Cheval who had followed up their retirement. Heinemann redeployed his battery behind the Black Hussars in support. In the centre the Uhlan Schwadron retired slowly before the French cavalry, and the Avante Garde Bataillon formed square (where it would stay for most of the battle). To the East the Leibgarde were rapidly approaching Gronnier’s guns along the road, while the 3 Leichte Bataillons headed for the high ground.

Turns 5 & 6: On the Eastern plain the Valiant 1er Ligne’s first two bataillons began firing on Moll’s Battery gun-line, and in the West Gronnier’s Horse Guns opened fire with canister on the approaching Black Leibgarde, completely missing them despite their field column being at near point-blank range! In the centre the Valiant Black Hussars were tossed back unceremoniously by the 1er Régiment de Chasseurs à Cheval and retired behind Heinemann’s Horse Guns to reform! In the East the first two Bataillons of the Valiant 1er Ligne stormed towards Major Moll’s Black Foot Guns, as the 1/1er Légère Bataillon alongside bore down on the hapless 3rd Linie, who were still meandering over the small ridge in March Column (being amateurs they had advanced rapidly on turn 2, resulting in them being near the enemy on turn 4 and having failed their DISC test then were unable to form line of field column)! The 1er Chasseurs à Cheval & 1er Hussars now retired away from Heinemann’s Battery as the 6e Chasseurs à Cheval now charged the Black Uhlan Schwadron, with the 5e Régiment de Lanciers Légère in support. In the West Marbais’ columns began ascending the high ground… Back out on the Eastern plain Major Moll’s guns frantically clattered away from the 1er Ligne, disappearing over the small ridge, promptly followed by the 3rd Linie, who’s commander fearing their likely inability to change formation so close to the enemy (only a 50% chance), instead sent them scurrying back the way they had come still in March Column (a ‘retrograde’ move). In the centre the Uhlan Schwadron disintegrated when hit by the 6e Chasseurs à Cheval, the survivors fleeing the field (maintaining the tradition that newly completed wargaming units always get immediately destroyed in their very first inaugural action on table)! Around the Western Heights the 1st Leichte Bataillon got itself into line (despite the enemy’s proximity) to cover the flank of the Leibgarde Bataillon who charged Gronnier’s Battery on the road, while the 2nd & 3rd Leichte continued up the heights. The Black Hussars opted to remain behind Heinemann’s Gun Line – although they failed to improve their state – but at least support appeared in the form of Pack’s British Brigade, who now arrived…

Turns 7 & 8: Little decisive firing occurred before Gronnier inexplicably chose to stand and deliver against the Valiant Leibgarde’s charge – managing to only inflict minimal damage on the Brunswickers before having his guns overrun, the surviving French gunners fleeing the field… Elsewhere the French made multiple charges, from East to West the 1/1er Légère charged the unfortunate 3rd Linie (still in March Column), the Valiant 2/1er Ligne hit the 2nd Linie, while the Valiant 3/1er Ligne hit the Eastern half of Heinemann’s Horse Guns and the 5e Régiment de Lanciers Légère endeavoured to charge the Brunswick Avante Garde’s square, while the 6e Chasseurs à Cheval supported them and cut the road between the Avante Garde and the Leibgarde. In the West Marbais continued to climb the heights, as the 1/3e Ligne Bataillon almost reached the North side of the hill charging the 2nd Leichte (who were still in March Column), and the 2/3e Ligne deployed into line at the road intersection to face the Black Leibgarde supported by Barbaux’s 6pdrs, who deployed to enfilade the Brunswickers (until now they had been marching around looking for somewhere to deploy).
Heading West back to East, on the heights, the 2nd Leichte (who were in March Column and had failed to change formation twice despite Von Butlar’s +1 Vigour to assist) turned out to also be Shaky and looked like they were toast, before miraculously throwing back the 1/3e Ligne (Marbais’ poor -1 Combat ability helping them). Heinemann’s Horse Guns rapidly struck camp (again) to avoid being overrun and galloped off to the protection of Pack’s Brigade, while the Avante Garde square in the end easily saw off the 5e Lanciers Légère, sending them galloping well to the rear to reform. To the East the 2nd Linie remained steady and saw off the Valiant 2/1er Ligne – but alas the 3rd Linie, in March Column, also turned out to be Shaky and disintegrated when hit by the 1/1er Légère (yet again proving the theory that wargaming units on debut always get annihilated the first time they roll the dice – the 3rd Linie had not been one of the infantry units to see action previously in our Crossroads Game). Heinemann now galloped over to the East and with Moll they formed a “Grande Batterie” to blast the 1/1er Légère into oblivion, and the 2nd Linie charged the Valiant 2/1er Ligne, while the 1st Linie formed into line behind them to cover the 1/1er Ligne. The Valiant 2nd Hussars now charged, hitting the Valiant 3/1er Ligne in support of the 2nd Linie, and from Pack’s Brigade the 2/44th East Essex (another Valiant unit – all Pack’s British Battalions were Valiant) deployed in line behind to stiffen Von Specht’s Brigade. In the centre the 3/1st Royal Scots advanced on the 6e Chasseurs à Cheval who were lingering dangerously close to getting in the Brunswickers’ rear. In the West the Leibgarde formed into line, while the 1st Leichte charged uphill into the repulsed 1/3e Ligne, and the Shaky 2nd Leichte managed to get themselves into line. By now the 3rd Leichte had made it around to the far side of the hill, beating Cam’s 2/2e Ligne by a whisker! Finally Pack’s remaining two battalions (42nd Royal Highland & 92nd Gordon Highlanders) headed for the heights to reinforce Von Butlar’s Leichte Bataillons, while Rogers’ 9pdr Foot Brigade prepared to follow them if needed.
Turns 9 & 10: On the high ground the 1st Leichte obviously found the up hill charge a bit testing as they turned out to no be Shaky for the balance of the battle, but they still smashed the 1/3e Ligne, sending the broken French unit pouring from the field (Marbais’ poor -1 Combat ability undoubtedly again helping), a medal winning effort! In the centre the Valiant 3/1er Ligne formed square and easily saw off the Black Brunswicker Hussars, the latter having a very poor day! However the 2nd Linie now turned into true heroes, truly inspired the Bataillon become so steadfast as to count as Valiant (for the remainder of the battle) and they stormed over the equally Valiant 2/1er Ligne destroying the French (and nearly taking their fanion) in a redoubtable charge that will go down in the annuals of history! This combat also saw the Brigade Commander Baron Soye killed and replaced by the rather incompetent Colonel Cornebise of the 1er Ligne (he had -1 modifiers for both Vigour & Combat). At this point the French morale casualty points outnumbered the Brunswick ones by 5 to 4 (both sides had to test for failure once reaching 11). On the East flank the 1/1er Légère rapidly back-pedalled to try and escape the Brunswick “Grande Batterie” but could not get clear of both gun lines, the Valiant 1/1er Ligne charged the 1st Linie’s line, while the likewise Valiant 3/1er Ligne deployed into line to enfilade the same’s flank (knowing the Avante Garde Bataillon could not interfere due to the threat from the mass of French Cavalry in the centre). In the West a musketry duel broke out between the 1/2e & 3/2e Ligne (who were in column), and the victorious but Shaky 1st Leichte (who were in line) before the 1/2e Ligne charged. Below them the 2/3e Ligne now charged the Valiant Leibgarde, supported by the 1er Hussars who came thundering through Barbaux’s gun line into the Black Guard’s open flank! In the centre the 6e Chasseurs à Cheval retired into an orchard to avoid the 3/1st Royal Scots while the 5e Lanciers Légère attempted an (ultimately futile) charge at the Avante Garde’s square. With the 1er Hussars’ charge screening his position Barbaux packed up his guns and headed to the rear, to deploy as cover for the potential hole opening in the French line to the East where the Brunswick 2nd Linie had broken through, while the previously inactive 1er Chasseurs à Cheval galloped through a gap in the Brunswick centre smashing into the 2/44th East Essex and catching them in line.
Needless to say the Valiant Leibgarde were overwhelmed by the combined arms attack, the Hussars mercilessly cutting them down, while above them the Shaky 1st Leichte gave a small amount of ground to the 1/2e Ligne. In the centre the 5e Lanciers Légère were predictably thrown back by the Avante Garde square, and the 1st Linie (who remained steady – i.e. Reliable) were also forced back (grudgingly) by the Valiant 1/1er Ligne! In the rear the 2/44th East Essex failed to form a hasty square in time and were immediately cut down by the rampant 1er Chasseurs à Cheval. Moll’s Foot Battery pounded the 1/1er Légère with canister (inflicting 2 DISRs – i.e. 50% casualties) while the Valiant 2nd Linie frantically tried to ‘come about’ to rejoin the fight (being amateurs for training their manoeuvrability in the face of the enemy was negligible), and Rogers’ deployed his battery in the rear to enfilade the roaming 1er Chasseurs à Cheval. In the centre the 1st Linie charged the repulsed Valiant 1/1er Ligne, while the Valiant 2nd Hussars once more came forth, despite being heavily disorganised (4 DISR), and charged the Valiant 3/1er Ligne in the rear (the 3/1er Ligne were deployed in line, and their flank & rear had been left exposed by the charge of the 1er Chasseurs à Cheval deep into the Brunswick position)! The Royal Scots advanced in support keeping pressure on the 6e Chasseurs à Cheval in the orchard, as to the West the two Highland Battalions finally appeared at the foot of the hill to support Von Butlar’s Leichte Brigade. On the hill the 3rd Leichte now got itself into line and the three Leichte Bataillons’ (two you will recall being Shaky) contented themselves now with forming a firing line and keeping the French under heavy musketry.
Turns 11 & 12: The Black Hussars charge was decisive and the Valiant 3/1er Ligne disintegrated (meaning 2 of the 3 battalions of the cream of the Division were now gone), however the 1st Linie were tossed back by the Valiant 1/1er Ligne, but not before they too showed their mettle against the French veterans (and gained Valiant status for the remainder of the battle)! In the West on the hill the combined musketry of the 1/2er & 3/2er Ligne columns decimated the Shaky 1st Leichte who broke and streamed from the field, the two French battalions then advancing on the 2nd Leichte’s position. Below the hill the 1er Hussars came streaming round behind the large barn and smashed into the 92nd Gordon Highlanders (who were still in March Column)! In the centre the 6e Chasseurs à Cheval also advanced, charging back at the 3/1st Royal Scots who had forced them into the orchard, and the remaining 2 French Cavalry Regiments manoeuvred to face the Black Hussars (and avoid the guns of Rodgers’ Brigade). Barbaux’s Foot Battery deployed in the centre, and at the Eastern end the 1/1er Légère charged Moll’s Foot Battery. The Morale losses were now French 7 and Brunswick 8 (remembering 11 was the danger number – so both sides were now within 2 units’ loss of checking for breaking).
In the West the Valiant 92nd Gordon Highlanders threw back the equally Valiant 1er Hussars behind the barn, despite being in march column and having no room to deploy into square! The British Infantry really is the best in the world! In the centre the 3/1st Royal Scots didn’t even bother to form square, facing the Chasseurs emerging from the edge of the orchard in field column, and sending them scampering pell-mell back all the way through the orchard to the road intersection beyond! At the other end of the battlefield Major Moll’s guns elected to stand and deliver, it being recalled the 1/1er Légère had already had one good canister blast so were half-way to being broken – another and they would be gone! Alas the dice gods were teasing, I rolled 8 dice needing 5 hits (5 or 6) to eliminate them, getting only 4 – however this still meant the 1/1er Légère took 1 more Disruption and so now had 3 DISR (4 would destroy the unit). A staunch fight by the gunners might still save the battery and destroy the 1/1er Légère in the process (leaving Cam’s French just 1 more unit’s loss from having to test for breaking)! However 2 Dice versus 5 Dice was a hard ask and alas Moll’s Battery was overrun and artillerymen dispersed by the French Légère… Morale losses were now French 7 and Brunswick 9 – although another 3 French units (all in front of Anglo-Brunswick Troops or Guns) were all only 1 Disruption away from breaking – so things still looked do able for the Brunswickers! The Valiant 2nd Linie now rejoined the fray, approaching within musket range of the almost broken Valiant 1/1er Ligne from behind, as the Black Hussars made one last herculean effort and charged into the latter from the front. The Valiant 1st Linie stood their ground in line, despite the threat of the 1/1er Légère on their flank, and Heinemann’s Horse Guns endeavoured to swing around to engage the French. In the West the two Highland Battalions got into field column (from march column) in preparation for deploying into line, and the Shaky 2nd & still steady 3rd Leichte began slowly advancing across the hill with their muskets blazing…

Turns 13 & 14: The Valiant Black Hussars were now impacted by a counter-charge from the 5e Régiment de Lanciers Légère which broke the brave horsemen, sending the battered remnants galloping from the field, before they could impact the equally Valiant 1/1er Ligne. Elsewhere the French line slowly reformed, on the hill two battalions of the 2e Ligne faced off with the Brunswick Leichte Bataillons, while the third engaged the 92nd Gordon Highlanders. The 2/3e Ligne Bataillon heading back to support the French Cavalry in the centre, while in the East the 1er Chasseurs à Cheval smashed into the rear of the Valiant 1st Linie Bataillon. The brave Brunswick Recruits had no hope of forming square and were run down mercilessly by the Chasseurs – bringing the Morale losses to French 7 and Brunswick 14! The 1/1er Légère managed to reform to some extent (recovering 1 DISR), but the Valiant 1/1er Ligne remained on the brink of breaking. The Valiant 2nd Linie poured musketry into the latter’s rear, but couldn’t get the 2 dice ‘hits’ needed to inflict the last DISR and break them – but the followed this up with a charge into the 1/1er Ligne’s rear. Heinemann’s guns had no choice but to limber up and retire West to join Rogers’ Brigade who had redeployed facing East again, and the Avante Garde Bataillon finally got out of square into line to advance in the centre (supported by the 3/1st Royal Scots). Around the high ground the musketry continued and the Gordon Highlanders now got themselves into line (finally), and the Anglo-Brunswick force passed its first ‘Army Morale Check’.
Turns 15 & 16: The defining event was the break of the Valiant 1/1er Ligne, having been charged in the rear by the Valiant, but Amateur, 2nd Brunswick Linie Bataillon – this brought the Morale losses to French 9 and Brunswick 14, the French now just one unit’s loss from the 11 needed for them to also start testing. In the East the 5e Lanciers Légère charged the Valiant 2nd Linie after their success above, and despite failing to form square (that Amateur training again) they threw back the Lanciers Légère, leaving them disordered and close to breaking (3 DISR) – they would be charging again for a while. On the high ground the two surviving Leichte Bataillons continued to win the musketry duel over the two 2e Ligne Bataillons, and slowly advance on them, but lacked the extra oomphh needed to force a conclusion with either – however the Anglo-Brunswick force again succeeded in its “Army Morale Check” and did not break.

Turns 17 & 18: As things ground slowly to minor bickering in most parts of the battlefield the French launched a charge on the 92nd Gordon Highlanders with the 1/2e Ligne and the 6e Chasseurs à Cheval. Up on the hill the 2/2e Ligne kept hanging on, the 3rd Leichte never quite able to get that extra musketry hit to break them (the 2/2e Ligne clung on for about 6 turns with 3 DISR, each French turn it would rally one off, each Brunswick turn it’d get one back from musketry). Finally on the third test, the Anglo-Brunswick force though still contesting two of the three French objectives failed it’s “Army Morale Test” and broke, giving Cam’s French a decisive victory; the French were still on 9 Morale losses and still one units’ loss (2) from having to check. The French had an overwhelming superiority of pursuit cavalry left on the battlefield and the Anglo-Brunswick force was decisively harassed as it fled the battlefield the retreat turning into a rout…
The Forces
All units on both sides are classified normal (or small – i.e. 4 bases) in Lasalle, except the Brunswick Hussar Regiment which is large (6 bases). Names in brackets of commanders are the personality figures who represented them on table (if the model figure is not the actual commander named). Netherlands & British Commanders stood in for the 3 Brunswick Brigade Commanders, as my 3 Brunswicker Commanders are the last part of my Brunswick army I have yet to complete. The forces were balanced out using our own Lasalle point system – you can get the latest version here.
For those not familiar with Lasalle commanders are rated for Vigour (i.e. how active & decisive they are) and Tactics (how good they were in combat) – the majority are average (i.e. 0 modifier) with the exceptions (Superior or Inferior) being denoted by +1 or -1 for that trait – unless its a special scenario with these predetermined these traits are determined randomly at the start of the game (in the game ours are noted in the OOB below in the sequence Vigour/Tactics). It is possible for a Brigade Commander to have Superior +1 Vigour but Inferior -1 Tactical Ability or vice versa. Infantry & Cavalry units are denoted by Esprit (Valiant, Reliable, Shaky, or Unpredictable which means they could be any of the other 3); Training (Experienced or Amateur Regulars, or else Irregular), Special Traits or Abilities (e.g. Must fight with Linear tactics, are Light Pursuit and/or Lance armed Cavalry, are Guard, etc), and Skirmisher (SK) effectiveness for infantry battalions. Artillery, other than Horse or Foot designation, are simply denoted by Gun Type (Light, Medium, Heavy), and Number of Bases (3 if 6 real guns, or 4 if 8 real guns).
The French 6th Division
- Jérôme Bonaparte, Prince of Montfort (Napoleon)
- 1st Brigade (Composite Brigade) – Maréchal de Camp Marbais (+1/-1 Ney)
- 3 Bataillons 2e Régiment d’infanterie de ligne (Reliable/Experienced/SK2)
- 2 Bataillons 3e Régiment d’infanterie de ligne – attached from 5th Div (Reliable/Experienced/SK2)
- 2nd Brigade (Composite Brigade) – Général de Brigade Baron Soye (0/0 Eugene*)
- 3 Bataillons 1er Régiment d’infanterie de ligne (Valiant/Experienced/SK2)
- 1 Bataillon 1er Régiment d’infanterie de Légère (Reliable/Experienced/SK2)
- Barbaux’s 6pdr 1/6th Foot Artillery Battery (Medium/4)
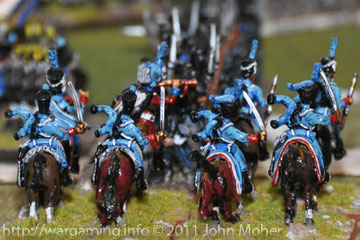
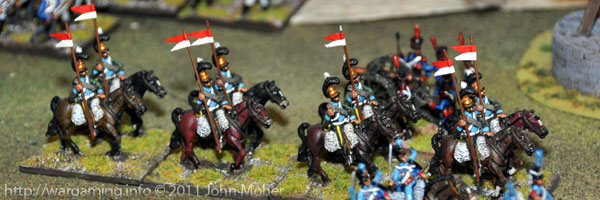
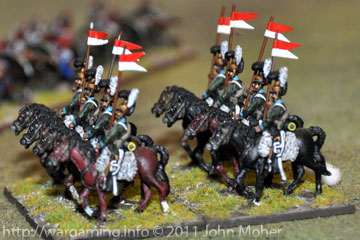
- 2nd Cavalry Division (as a Brigade) – Général de Division Baron Piré (+1/0 Murat**)
- 1er Régiment de Chasseurs à Cheval (Reliable/Experienced/Pursuit)
- 6e Régiment de Chasseurs à Cheval (Reliable/Experienced/Pursuit)
- 5e Régiment de Lanciers Légère (Reliable/Experienced/Pursuit/Lance)
- 1er Régiment de Hussars – attached from 4th Cav Div (Valiant/Experienced/Pursuit)
- Gronnier’s 6pdr 2/4th Horse Artillery Battery (Medium/3)
* G.d.B. Soye (Eugene) was a casualty halfway through the battle and replaced by Colonel Cornebise of the 1er Ligne (-1/-1 Eugene).
** Command of the French 2nd Cavalry Division (Brigade) was a deadly assignment this day – G.d.D. Baron Piré (Murat) was seriously wounded in the first serious combat of the battle and promptly replaced by Général de Brigade Baron Hubert (0/-1 Lasalle) who in turn was then killed shortly after in a subsequent action again before the battle was even half-way through; the formation then being commanded for the remainder of the battle by Général de Brigade Baron Wathiez (-1/-1) who was not at his particular best this day, and along with Colonel Cornebise (above) being the two worst French Generals present (if not in all time history)!
The Brunswick Corps (with British 9th Brigade attached)
- Frederick William, Herzog Von Braunschweig-Wolfenbüttel-Oels, the Duke of Brunswick
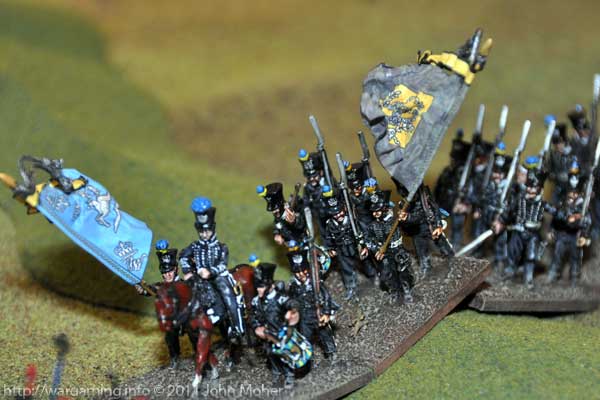
- Brunswick Avante Garde & Cavalry – Major Von Cramm (-1/0 Gighny)
- 2nd Hussar Regiment (Valiant/Experienced/Pursuit – Large)
- Uhlan Schwadron (Reliable/Experienced/Pursuit/Lance)
- Avante Garde Bataillon (Reliable/Experienced/SK2)
- Capt. Heinemann’s 6pdr Horse Artillery Battery (Medium/4)
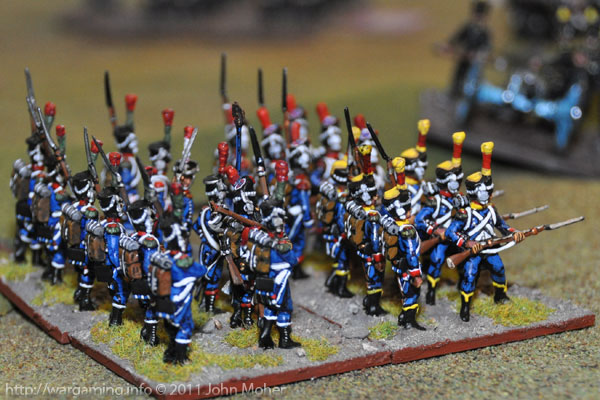
- Brunswick 1st (Leichte) Brigade – Lt.Col Wilhelm Treunch Von Butlar (+1/0 Trip)
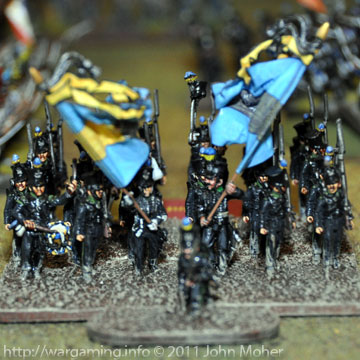
- Leibgarde Bataillon (Valiant/Amateur/SK1)
- 1st Leichte Bataillon (Unpredictable/Amateur/SK1)
- 2nd Leichte Bataillon (Unpredictable/Amateur/SK1)
- 3rd Leichte Bataillon (Unpredictable/Amateur/SK1)
- Brunswick 2nd (Linie) Brigade – Lt.Col Friedrich Von Specht (0/-1 Halkett*)
- 1st Linie Bataillon (Unpredictable/Amateur/SK1)
- 2nd Linie Bataillon (Unpredictable/Amateur/SK1)
- 3rd Linie Bataillon (Unpredictable/Amateur/SK1)
- Major Moll’s 6pdr Foot Artillery Battery (Medium/4)
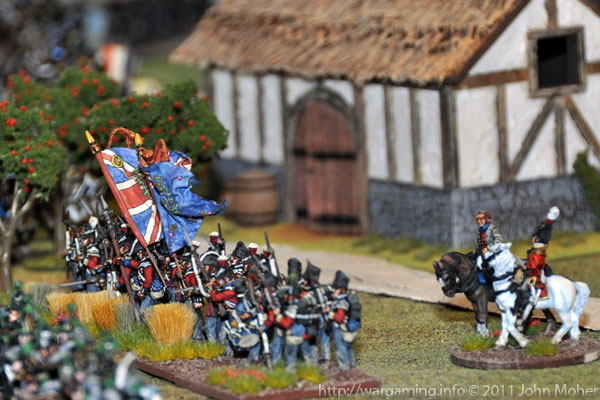
- British 9th Infantry Brigade – Major-General Sir Dennis Pack (0/0)
- 3/1st (The Royal Scots) Foot (Valiant/Experienced/Linear/SK2)
- 42nd (Royal Highland) Foot – the Black Watch (Valiant/Experienced/Linear/SK2)
- 2/44th (East Essex) Foot (Valiant/Experienced/Linear/SK2)
- 92nd (Gordon Highlanders) Foot (Valiant/Experienced/Linear/SK2)
- Rogers’ 9pdr Foot Brigade, RA (Medium/3)
* Lt. Col. von Specht became a casualty about halfway through the battle and was replaced by Major Metzner of the 1st Linie Battalion (-1/-1 Halkett).
The 9th British Infantry Brigade was a reserve unit – so started the game off-table.
Game Images Gallery


Great looking game and good to see old Grant Scn Book in action !
Cheers Gary – Yes I’m on a mission to try and play as many games as possible over the next couple of years (in any period) using C.S. Grant’s Table Top Teasers and/or Scenarios for his books! 🙂
Very nice, I have to say that the Brunswick army is one of the most attractive in he Napoleonic wars. I have been switching out to Flag dude myself, yours look great.
John
Hi John – yes, there is something about the Brunswickers, especially with the revised uniforms in 1815 – once they’ve all had a Tamiya Flat Clear coat to matt them down I’ll have to take some good staged photos… And yeah I’m sold on Rick’s flags now – while GMB are physically better quality images per se, it’s hard to beat Rick’s animation, and for the price when the flagstaff & finial/eagle, and all tassels/etc are also included for each flag it’s a no brainer! 🙂
Forgot to ask are those home-made counters visible in game ?
Hi Gary – yes they are. 🙂
Do you have them available anywhere ? looks very like you have printed them onto boardgame style counters and very nice they are too 🙂
Hi Gary – yep – I printed them out and sprayed them with artists fixer (matt lacquer) to set the ink then glued them to 3cm square (3mm thick) MDF bases I had spare (from old Spearhead projects). I can email you a set if you like – just give me a day or so… 🙂
Hi John
Would love a set sgt.steiner@virgin.net 🙂
OK – I’ll try and remember to do so next couple of days – remind me if I forget… 🙂