As previously described to my readers, we had been recovering from our battle that was the preview to the great fight at Gettysburg. We had steadily but slowly pursued General Lee into central Virginia, but then in October he had suddenly turned around and marched North again, endeavouring to turn our western flank and get behind us (to cut us off from Washington). Retiring along the Orange & Alexandria Railroad we shadowed Lee’s Army of Northern Virginia as both armies moved north.

Suddenly on the 14 October Lee turned and struck at us – at Bristoe Station – and as Lt. Gen. A.P. Hill’s Confederate Third Corps endeavoured to attack the rear guard of our V Corps, who were across the Broad Run, the main part of II Corps was quietly and rapidly deployed by Maj. Gen. Gouverneur K. Warren (it’s temporary commander) in dead ground behind the Orange & Alexandria Railroad’s embankment. As the Corps moved forward to ambush A. P. Hill’s advancing Corps, my division was sent around the Southern Flank to endeavour to turn Hill’s flank and get behind his Corps just as they became engaged by the main body of II Corps…
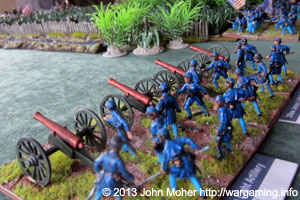
I deployed the strongest of my units on my left (the end of our line), these being the 4th maine, 1st Minnesota, 6th New Jersey, and the 54th Massachusetts (Coloured). These were all fine Regiments with reasonable numbers of men and mostly eager for action. They would be supported in my centre by the massed artillery of my division (2nd New Jersey Battery, and Battery L, 1st Ohio Artillery). My more veteran and worn out regiments (who lacked men or were generally reluctant in battle) I then used to cover my right and my tenuous connection to the main body of the Corps north of me.
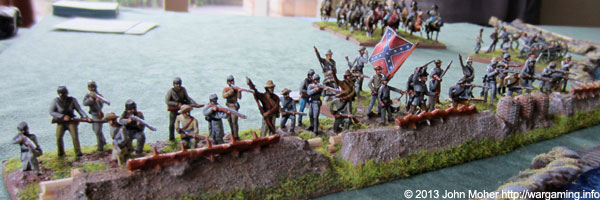
We were in a fairly wooded area, with some fields of late crops not yet harvested, and criss-crossed by minor streams & creeks (all tributaries of the Broad Run). We advanced rapidly on our left through a wooded area towards the open Southern Flank of the rebel force, and more cautiously on the right simply to maintain our line. My batteries commenced intensive counter-battery fire to silence a visible Confederate battery to prevent it’s interference in our moves. They were successful in this and half the battery was almost immediately silenced. However the Confederates had pre-empted our attack sufficiently that as we cleared the woodland we came upon one of the small creeks only to see them rapidly completing hasty entrenchments of fallen timber, rocks, and other debris piled with soil where possible. This was, my reader, going to be a bushel of corn harder than the perambulation first imagined!
No sooner had we come upon these earthworks (both opposite our main attack on my left, but also in the centre), than the enemy (General Longman as you will have guessed my reader) put in his own counter-attack on his left (that is to say, against my right, a suitably weak and vulnerable deployment). Action was soon fiercely underway there between my regiments (the 69th New York, 4th Vermont, 2nd New Hampshire, and 20th Indiana) against two large fresh confederate units (11th Virginia & 9th South Carolina).

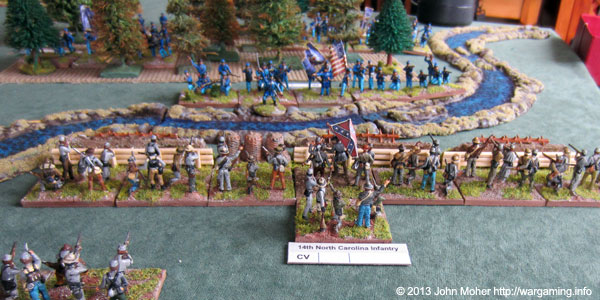
On my left the 4th Maine valiantly battled across the creek and charged the rebel ramparts manned by the 14th North Carolina – a vicious fight ensued before the 4th Maine were thrown back across the stream, and with heavy casualties… My on-going artillery bombardment was working well and the remainder of the confederate battery (the ‘Loudon’) was rapidly silenced – my guns now turned their attention to the second rebel battery that had appeared (the ‘Lynchburg’). However on my right the rebels became even more aggressive, with the 10th Alabama and the dismounted 2nd Virginia Cavalry (the famous Lynchburg Cougars) joining the attack in the centre to support the 11th Virginia. (At this point casualties favoured the Confederates 4 to 2).
The 54th Massachusetts soon joined the 4th Maine along the creek, and jointly the began a furious musketry duel with the rebel defenders, before the later, for no clear reason, abandoned their earthworks and rushed pell-mell into the centre of the creek to continue the musketry duel at near point blank range. The 4th Maine and 54th Massachusetts did not need a second invitation and charged as one against the recklessly exposed 14th North Carolina. Meanwhile on the right the rebel advance continued and our tired regiments manoeuvred to try and contain the aggressive confederates. My artillery did well, silencing still more rebel guns, with just ½ the Lynchburg battery’s guns remaining in action. Back on the left my brave regiments threw back the 14th North Carolina but with surprisingly light losses to the rebs, and it was during this action the heroic Colonel Elijah Walker of the 4th Maine was sadly cut-down (a great loss). In the meantime the 4th Virginia Cavalry had dismounted and advanced to reinforce the earthworks, and prevent us from advancing over them uncontested after defeating the North Carolinas! (Casualties now favoured us, just, at 6 to 7).

However about this time the gods of war ceased to smile upon us, and we were dealt severe blows on both the left and right – the 54th Massachusetts (especially) and 4th Maine were subject to increasingly heavy musketry and canister from the remaining Lynchburg guns, and likewise the Fighting Sixty-Ninth New York in the centre. I pulled the 54th Massachusetts back into the cover of the woodland, but the 4th Maine were pinned down along the creek right in front of the earthworks, and along the centre and right the confederate pressure was starting to increase. (Casualties back to favouring the Confederates 11 to 8).
On my right the confederate pressure became too great, they out gunned us and then charged our weakened and tired regiments, and the 4th Vermont, 2nd New Hampshire, and 20th Indiana all broke and my right effectively collapsed. My division was exhausted and we were forced to abandon the action and retire in the best order we could. (Casualties now in favour of the Confederates 21 to 10).
My Division ended the battle in the following state:
- The “Fighting Sixty-Ninth” 69th New York (Strength 4; Veteran)
- 4th “Magnificent” Maine (Strength 3; Old Reliable’s)
- 6th New Jersey (Strength 3; Veteran)
- 2nd New Hampshire – broken, attempting to reform
- 4th Vermont – broken, attempting to reform
- 20th Indiana – broken, attempting to reform
- 54th “Unstoppable” Massachusetts (Coloured) (Strength 2; Veteran)
- 1st Minnesota Infantry Regiment (Strength 7)
- Battery L, 1st Ohio Light Artillery (2 x Rifles)
- Battery 2, New Jersey Light Artillery (2 x Napoleons)
- Victory Points Earned: 4
General Longman’s Confederate force was thus:
- 11th Virginia “Rolls With The Punches” (Strength 6; Veteran; Hero; Sharpshooters)
- 10th Alabama (Strength 4; Veteran)
- 9th South Carolina (Strength 5; Veteran)
- 14th North Carolina (Strength 7; Veteran)
- 14th Louisiana (Strength 3; Veteran)
- 2nd Virginia “Lynchburg Cougars” Cavalry (Strength 3)
- 4th Virginia “Deadly On 2 Legs” Cavalry (Strength 7; Veteran)
- “Loudon” Artillery Battery – ordnance lost, survivors returning home to re-equip
- “Lynchburg” Artillery Battery (1 x Napoleon)
- Victory Points Earned: 6
There followed some more action over the next two days around the Rappahannock followed then by a small lull. In November we headed back South, forced our way back across the Rappahannock at Rappahannock Station taking Lee by surprise and then prepared to go into winter quarters around the vicinity of Brandy Station and Culpeper County.


Again, your command suffers a serious rebuff! How is it the casualties are so lop-sided against you? Poor die rolling? Out-played?
Hi Justin – well this game was pretty even until almost the end. However there were several factors to consider regarding the outcome:
1. It was our first game on a ‘large’ 1800mm x 1200mm (6′ x 4′) table, all our previous games were on 1200mm square (4′ x 4′). As a result I unnecessarily strung my centre & right out too far – leaving my smaller Regiments vulnerable to being ‘mobbed’ individually by numerically superior opponents.
2. My ‘terrain’ backfired on me – streams are difficult terrain and so disorder troops crossing, and I placed the central stream to cut Cam’s position in half to allow me to ‘mob’ him on one side and make it harder for him to bring reinforcements from the other side. At this time I planned to launch a massive assault with 90% of my units on my right through the sparse woods on that flank. However Cam then placed more woods there and the fields in the centre meaning my artillery would be near useless on that flank. He then finished off by placing a second stream on my left (the ‘Y’ branch the 4th Maine attacked across) which made my left flank less desirable too, but I decided (incorrectly in hindsight) that was the lesser of he two evils as Cam deployed almost no troops that side of the central stream.
3. Objectives – my objective was to get troops off table (i.e. behind his flank). I could exit from Cam’s half of the left hand table edge, or Cam’s baseline table edge along the left two-thirds of the table. The left flank was the closest point although required crossing the stream. My original plan had been to start on my right and do a big sweep through the right flank exiting my units off the centre part of his baseline, however Cam put two of his three best & biggest units there plus half his artillery (he had to deployed first), the distance to cover was double, and my artillery advantage was negated by the woods and fields. As mentioned I opted for the left which was half the distance, my artillery could support the flank, and I just had to cross the stream & beat up one good unit quickly!
4. Entrenchments – Cam was lucky with his entrenchments, he got several units entrenched very quickly, most notably the 14th North Carolina on my left.. If not the 4th Maine’s initial assault could have well thrown them back which would have made a big different. The entrenchments then had a big impact in the musketry duel, effectively halving my units firepower versus the 14 NC’s so I couldn’t use attrition to wear him down…
5. Sudden Collapse – the turn before the end things were still pretty even, casualties were about 12 to 10 in Cam’s favour, but he pulled out a big tun of charge combats on my right with big numerical advantages and lots of bonuses that my small units that were already depleted by his musketry couldn’t survive – it was a rather dramatic collapse!
That said I piled too many troops too close behind each other on the left, so could not easily change axis to move round the earthworks to attack up the centre. I was also unlucky not to eliminate his last gun (got hits but failed to convert to kills), that lone gun then blasted the 54 MA with canister for 2-3 bases of casualties.
In hindsight, if I could redo my deployment with everything else the same I’d have stuck to Plan ‘A’ and put all my left wing troops on the right instead and driven through the 3 wooded areas towards his centre baseline. I’d leave my artillery where it was to counter-battery his and make the stream too risky to cross, and I’d just leave my 2 smallest units to guard it. My last 2 smaller units would then be a central reserve, or be used to push around extreme edge of my right flank.
Cam was also very astute in that as soon as he saw the best of my troops tangled up & committed in the wood on my left (i.e. my second turn) he rapidly counterattacked on my right then, as that went successfully, my centre. Using his local superiority in numbers to maximum benefit.
WoW, I must say I agree with Justin, you got well beaten up again and you dont have any reasonable strength units left….
Going forward, this will be interesting
Hi Scruff – indeed! But see my response to Justin. Also the campaign is a lot about ‘your’ career (i.e. the player’s character) as a General, so you don’t actually need to win all the battles to ‘win’ the campaign – you just need to be the most heroic, get the most glory in the battles, get your name in the papers the most, reach the highest rank, etc…
In this battle our VP scores are only 1 different, and Cam’s General has a special ‘bonus’ that gives him an extra ‘bonus’ VP each battle. So despite the apparent major tactical loss, I actually earnt as many VPs as Cam! 🙂
hmmm interesting, so you could throw in a massive assaults, rack up massive losses, and become famous lol and win.
That said, prob not a good idea going forward as you could run out of troops. Is it possible to actually run out of troops?
looking to the next installment
cheers
Well, yes, on paper at least – look at Burnside, McClellan, and co – Wealthy Businessmen, Presidential Hopefuls, etc… 🙂 But in practice probably not – if you keep losing (which I’m starting to make a habit of) it just gets harder and harder to rack up more VPs than your opponent!
Technically no – the campaign allocates a minimum number of stands per force depending on the year – but you do end up with new recruits and as the war goes on they are not very enthusiastic (so basically poor skills AND no enthusiasm to charge, etc).
Should be up by end of the week – we played two games last weekend so second to come (you & Justin probably aren’t gonna like the outcome of that one either)! 😉
hahaha you are trying to win the war right?
cheers
Hell No! I have self-glory to achieve! As Cam posted somewhere else “But what if you lost most battles and made silly charges that lost nearly every unit you commanded. Well, there is a divisional general who 150 years later has a wiki page and who is more famous than almost all his peers – George Pickett. So even failure can lead to eventual fame.“
P.S. This game was more or less a role reversal of the Cornfields 1863 Game in terms of the casualties inflicted, except in that earlier game we allowed Cam to disengage his force (technically he couldn’t by the letter of the law) rather than play out 2-3 more turns where I would have inflicted major casualties in similar fashion to how he did to me in the game above.
Note: Once you get sizeable numbers (e.g. 2:1 or 3:1 in bases), or get in the flank or rear of an enemy unit you can usually rack up casualties fairly decisively and grind the (defending) unit(s) down fast. Units reduced to 1 stand are automatically removed so 1 casualty on a unit with just 2 stands left is actually 2 casualties anyway (much like how F&F worked/works).
Interesting report. I see the Confederates threw up some works. Is it the case that works start to appear more and more from here on out?
Hi Phil – yes indeed – as the war progresses the likelihood or frequency increases. So in 1864 and 1865 games you can expect to see defenders regularly throw up hasty entrenchments (in real life basically piles of logs & stones and other collected debris with some dirt piled over the top, that you can kneel behind and be almost impossible to hit with a musket shot – rather than conventional trenches which were still rare except major sieges like Vicksburg and such). This can be done during the game as the length of time per turn is abstracted allowing for these (which in real life could be completed in just 1-2 hours by a well organised unit providing a quite significant defensive position)!
You will note Cam and my early games of this campaign involved lots of charging & assaults, now they are gradually seeing more and more shooting (as our units Veteran status evolves), and less frequent charges (as in the game above) – so you will see us resort more and more to entrenchments in the remainder of the campaign as a result.